
DIY
Torklift Central’s EcoHitch for the Tesla Model S Review
It long seemed like a “given” that electric cars could not haul much. We’d grown accustomed to that idea right up until the big packed Model S got all frunky fresh and hatch-backed. While there is a dedicated group of owners who like to cram their origami bicycles into the front of the vehicle, for most of us the alternatives were pretty limited– especially if you have children, as most DOT rules prohibit using bikes piled on their laps as a restraining device, effective though they may be.
Perhaps as a result of the Tesla being touted as a family car, the panoramic sunroof became one of the most desired options– and priced accordingly– not for its swagger and bragging rights, but for its practical rack mounts. The reality of a roof rack is another story. Unless you’re Yao Ming tall and Samson strong, the prospect of heaving a bike above your aluminum-bodied and glass-roofed beauty was never enviable. Whenever I imagined myself doing it, it was something more along the lines of Pee Wee’s Big Adventure. “HA HA heh heh heh.” Then Torklift came out with their EcoHitch for Tesla.
Torklift Central’s Tesla Model S “STEALTH” EcoHitch
The EcoHitch from Torklift Central promised to add functionality without detracting from the swoopy lines of the Model S. Consider that at the time the hitch was launched the “family Tesla” was still quite rare and I was a little curious how well-designed such a niche product could possibly be. Scouring their website quickly assured me that getting hitched with Torklift was no shotgun wedding. Though the relationship was new, Tesla and EcoHitch had already consummated their passionate courtship. Could it really provide a stable mounting point and stay discreet?
3 Year Update: Life with Torklift’s EcoHitch for Tesla Model S – Eaten alive
Our EcoHitch came with the 2” receiver but there is a 1 ¼” available. It will hug anything you slide into it, including bike racks, ski /snowboard rack attachments and light trailers. Important to note that while a full bike rack is unlikely to overload the EcoHitch’s 200 lb tongue weight, a cargo tray with a deer that has been feasting on my wife’s garden certainly will. You could tow a trailer but the Tesla isn’t rated for that and I would suspect any damage that resulted would be out of warranty. Don’t head down to the local tractor pull competition just yet– Torklift suggests a 2000 lb limit on those kind of activities which would require a wiring harness for the lights and deep pockets if your luck runs out.
Initial Impressions
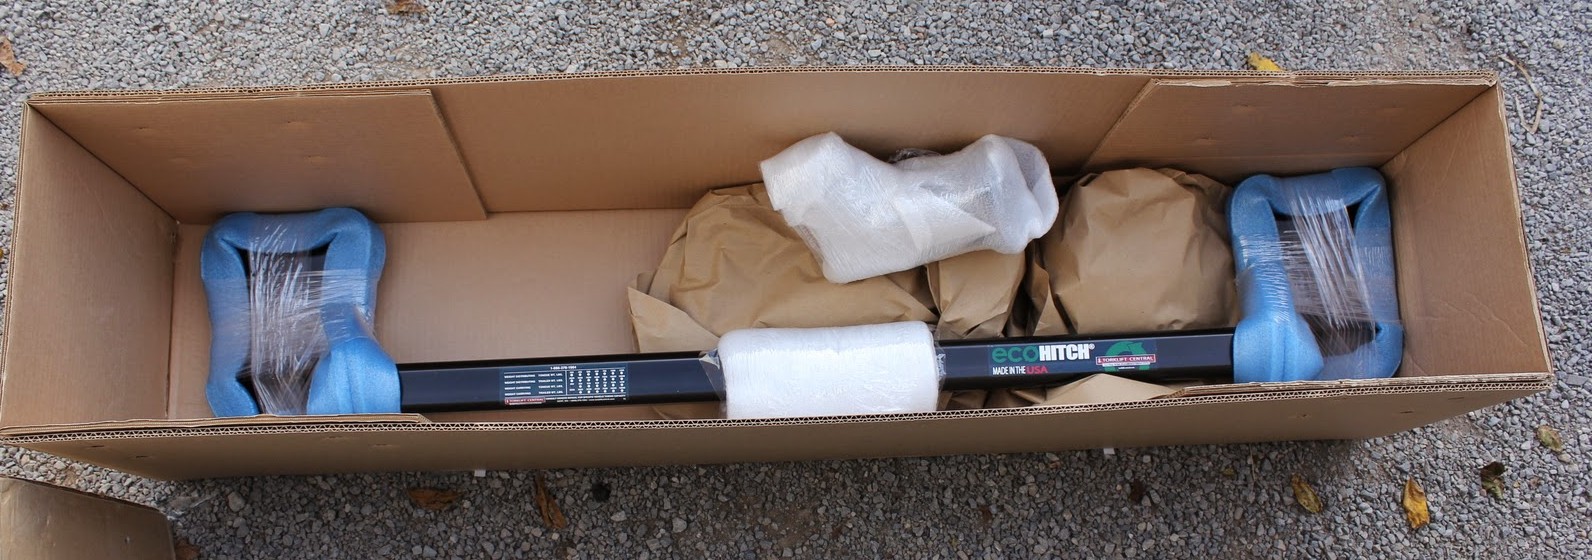
The EcoHitch weighs in at under 30 pounds (according to the spec sheet) but don’t let that little number fool you. Sure, it’s lighter than a 3rd grader but still hefty enough you wouldn’t want to encounter a maniac wielding one in a dark alley. The hitch arrives in a well packed box and you can’t help but note the paint is thick and well applied, the hardware high quality and the design is very clever. It seems almost too clever to be true. I was still in disbelief.
The last hitch I installed on a car was a couple Subarus ago and its complex assortment of braces hung well south of the exhaust system and rust was never a concern because it was regularly scraped off the bottom edge by even modest speed bumps. It was also a great repository for road kill– but you really don’t want to do any lengthy pondering on that. I’m getting light-headed just remembering it as it roasted, trapped against the hot exhaust– but nevermind. The EcoHitch, by contrast, is delightfully small and simple.
I’m dedicated DIYer but like to think I know where to draw the line. You’ll find no home dentistry kits squirreled away in my vanity and that same wisdom dictates that the EcoHitch find its way into the hands of a qualified auto surgeon.
RELATED:
- Tesla Model S DIY How-tos
- DIY Tesla Dash Cam Installation
- Torklift emovable Tesla Model S Front License Plate Bracket
For my installation I selected a local body shop with good referrals and a strong history of detail-oriented repairs on high end cars, Rob Wagner Auto Body (certified Torklift installer) in West View, PA.

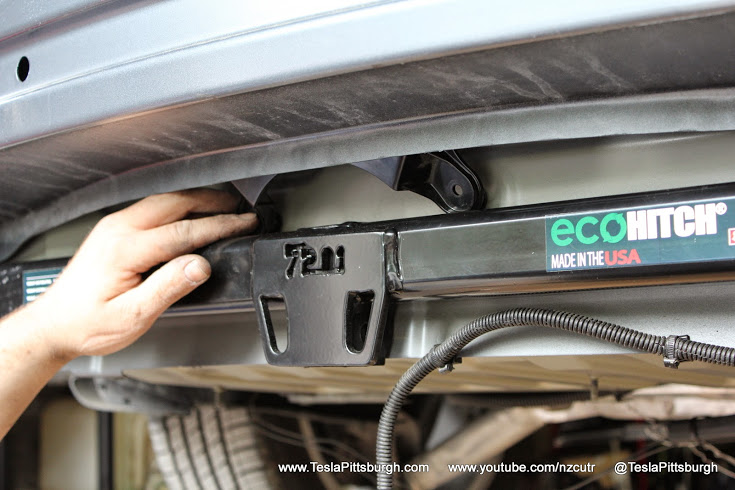
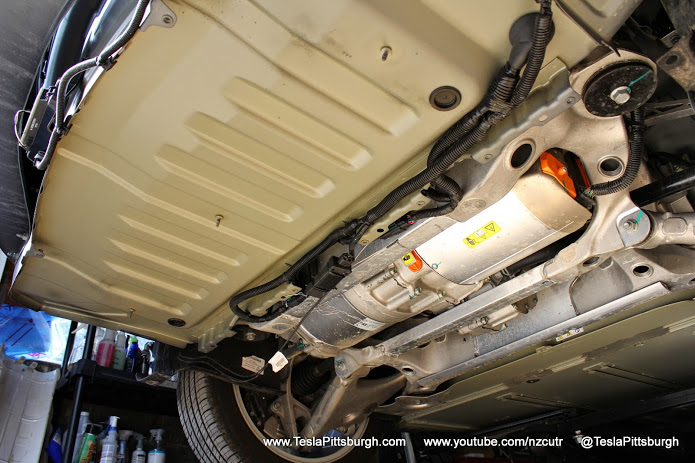
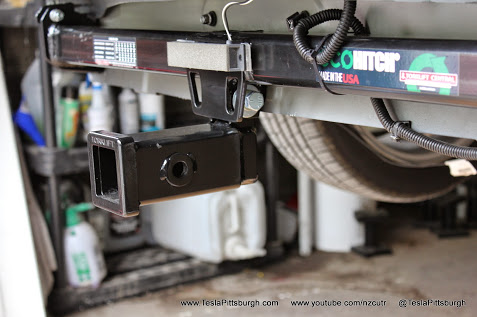
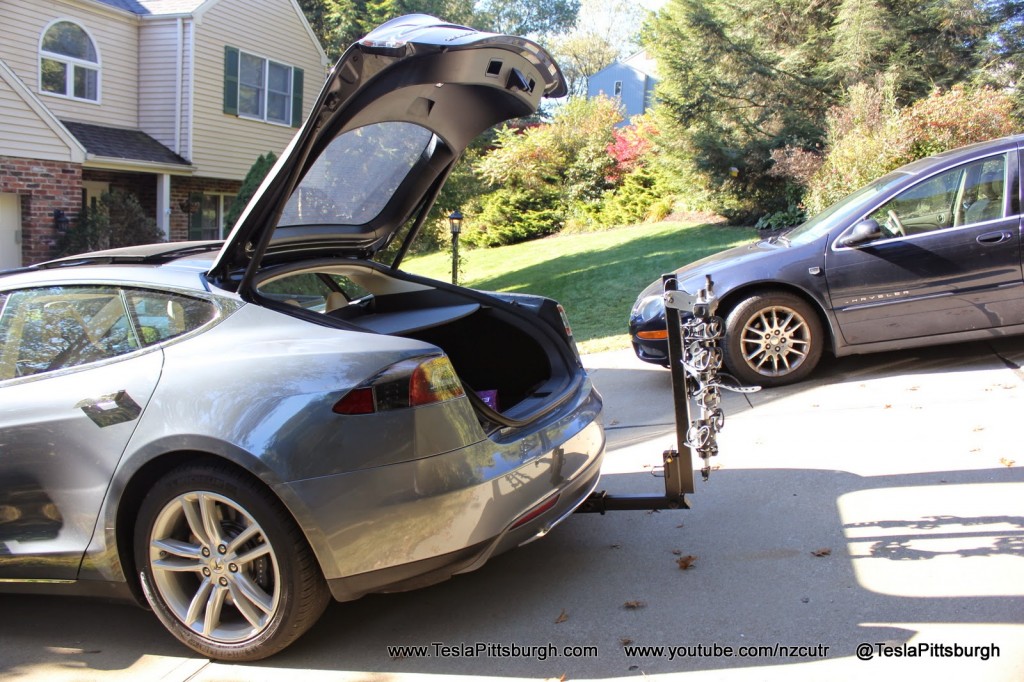
Think back to the well-known Tesla “skateboard” display you’ve seen in their stores or website. At the back of the rolling chassis are two blunted aluminium 8-shaped extrusions, which on an actual Model S extend to the rear of the car. The rear crash beam bolts onto these beams and ties the structure together. The EcoHitch is designed to be sandwiched between these beefy beams and the rear crash beam. To get the hitch there, however, a complete disassembly of the back end of the car is required. It’s a lot of delicate work to accomplish and seeing the gorgeous engineering behind Oz’s curtain isn’t for rookies. Don’t risk disfiguring your California beauty– as we all know, surgery on her is VERY expensive.
Installation
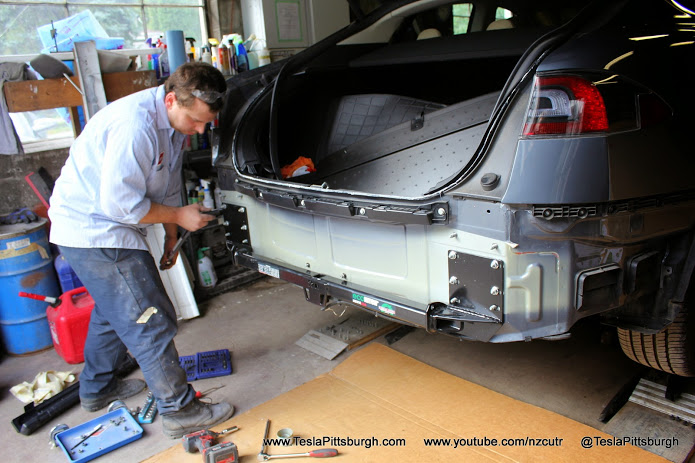
Torklift estimates an installation time around 3 hours and that’s probably about right for an experienced shop. Mine took a little over 4 hours but these guys were making a lot of fine tuning and sweating each detail– they even color-matched a small tin of paint so the tool marks on the bumper bolts (which no one will likely ever see) would still look factory fresh.
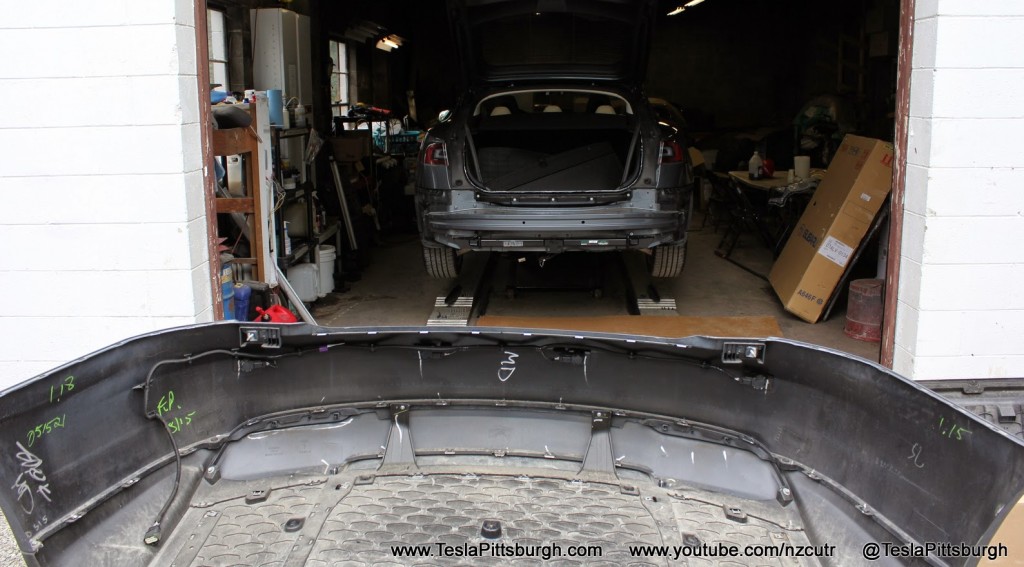
We also decided to reuse the Tesla bolts where possible instead of the Torklift ones. The EcoHitch requires no drilling anywhere– well, almost. The most nerve-wracking part of the installation, the cutting of an access hole in the rear diffuser, was no less daunting to behold than to imagine. I was in good hands but still incredulous I was letting someone do this… hats off to any DIYer who has the cojones to hack at their car.

There were a couple of necessary deviations worth noting. A couple of washers the Torklift instructions indicated should be removed were so tightly affixed by the sealants and overspray that we had to leave them in place. It didn’t affect the structure or the quality of the hitch mounts but did serve as a reminder that this IS an aftermarket part.

Another reminder was a fob (?) sensor box delicately mounted inside the rear bumper… with Velcro and zip ties. Oh, that was factory spec– a reminder that this IS Tesla’s first mass market vehicle.
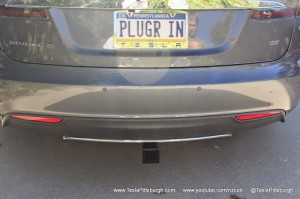
100% Stealthy
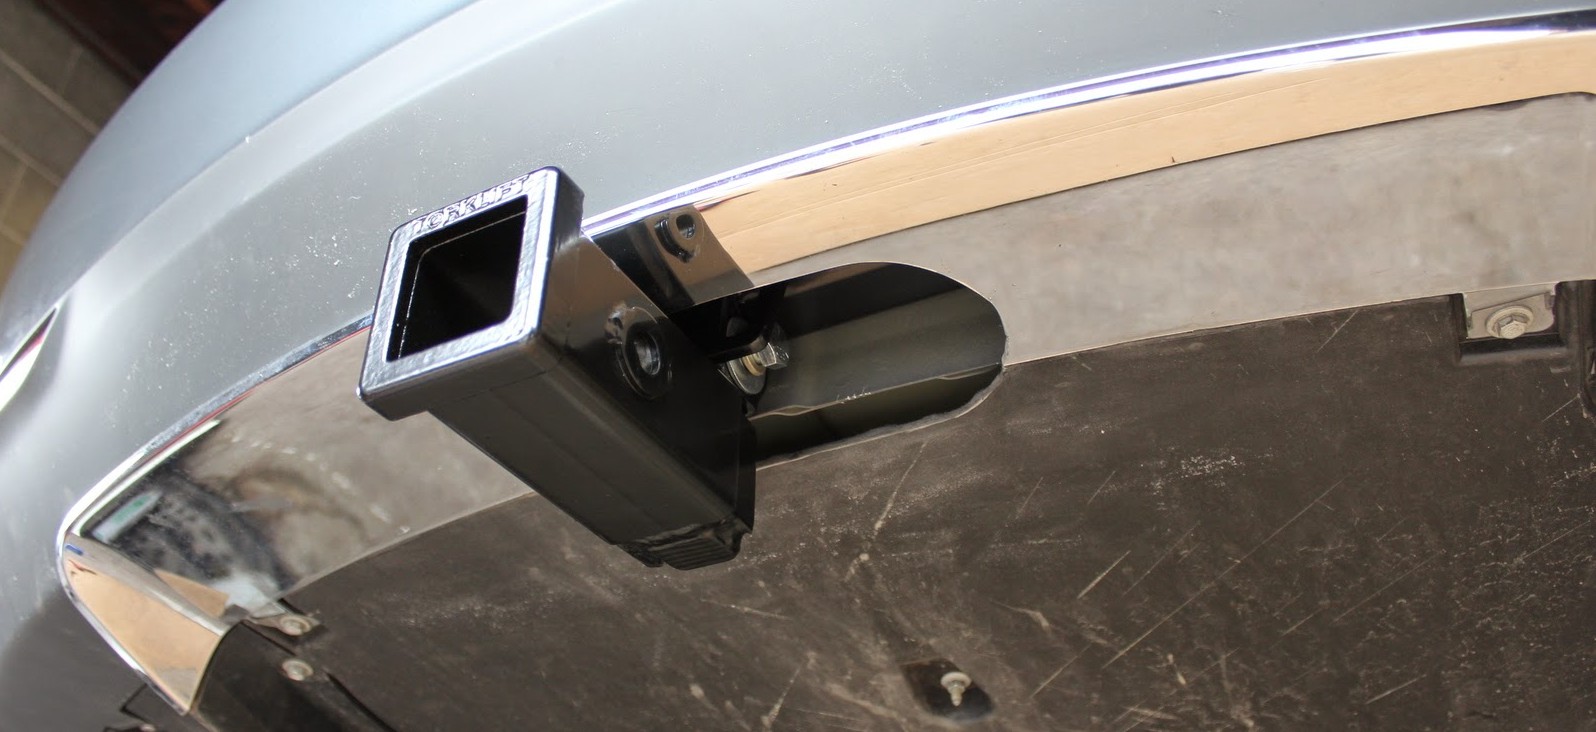
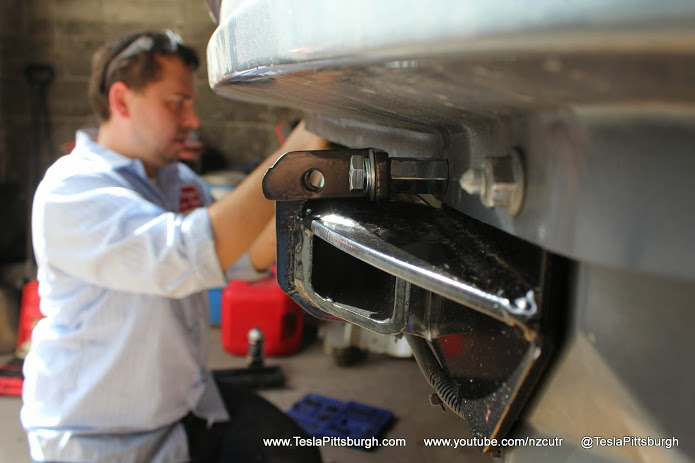
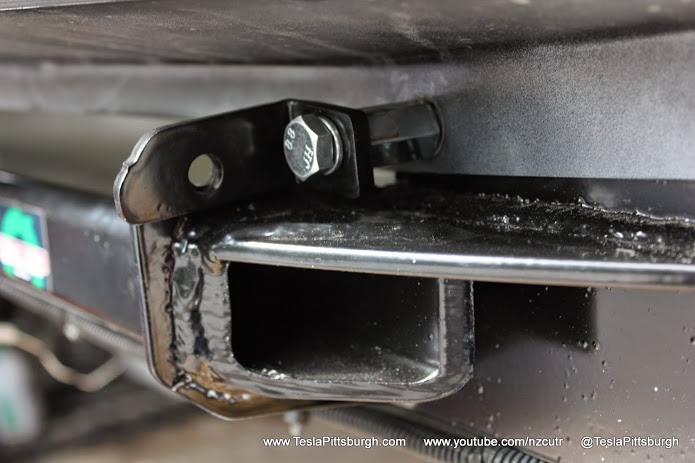
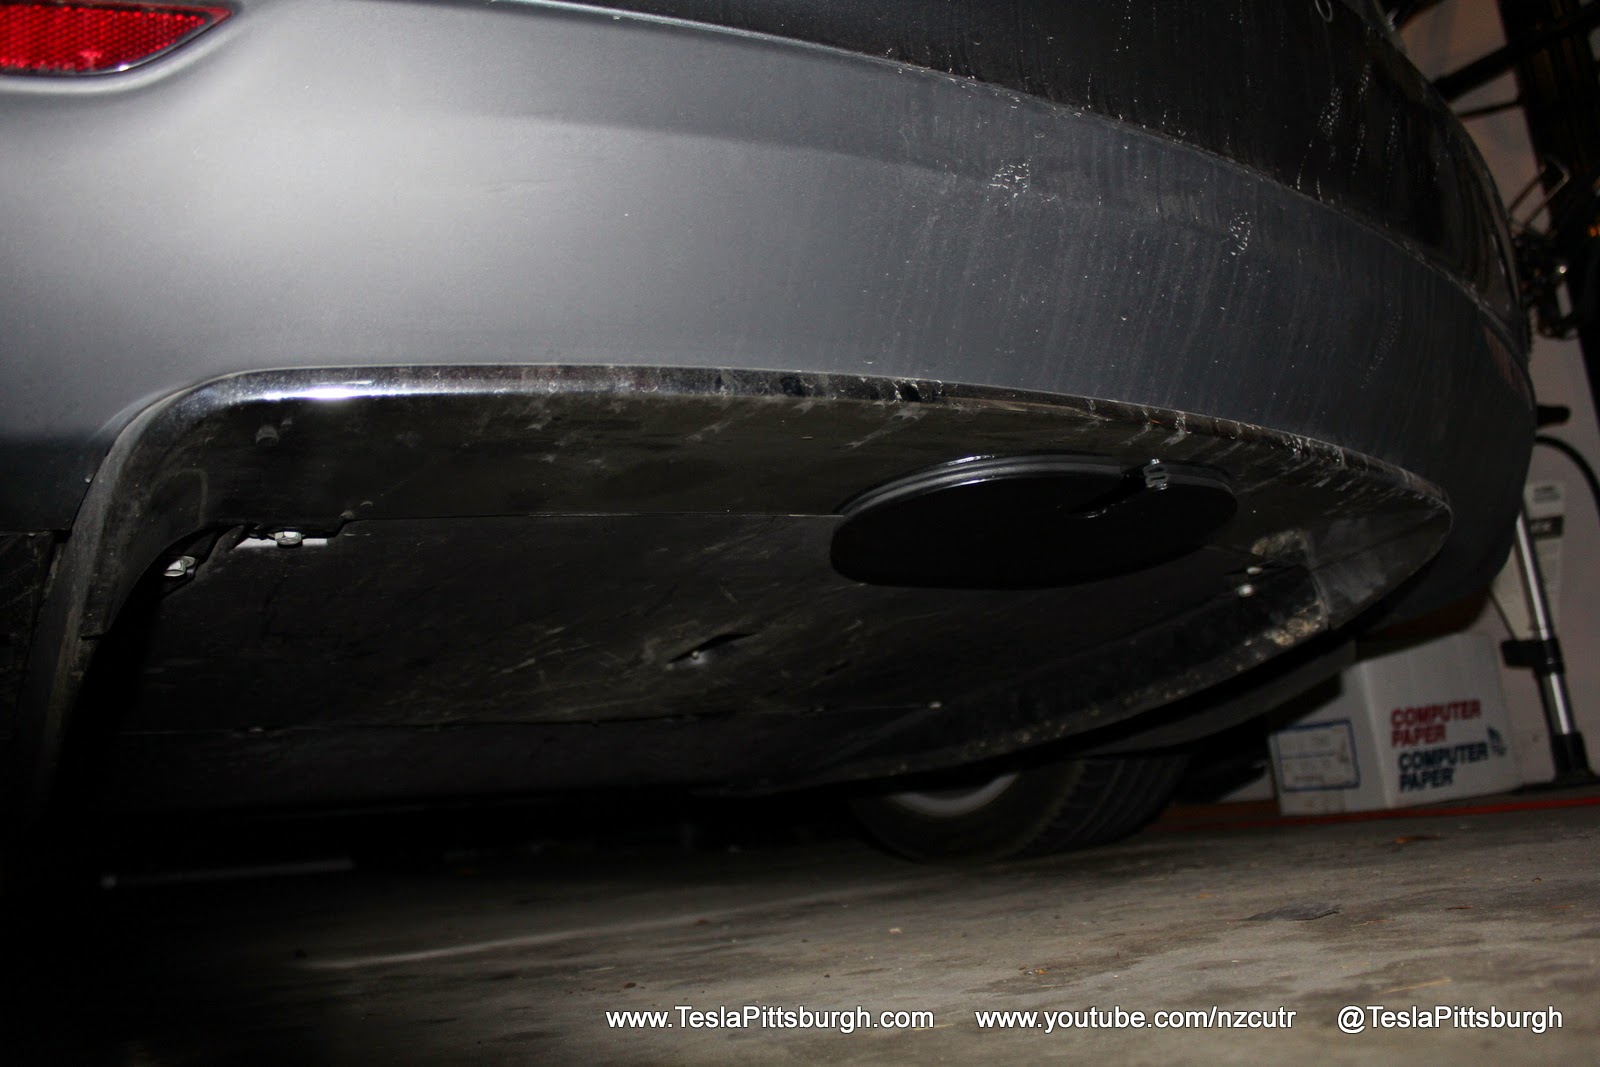
With the hitch installed and the car back together the result was… underwhelming. It is absolutely invisible from any normal standing height. This isn’t an accessory you buy to show off. There is no bling. The only indication anything has happened is the hole in the diffuser with just enough room to comfortably fit your wrist into and to work a socket wrench to attach the drop post receiver. Even that can be disguised– Torklift makes a magnetic cover (also ingenious) that “thonks” up into the receiver slot so even the underbody aerodynamics are preserved.
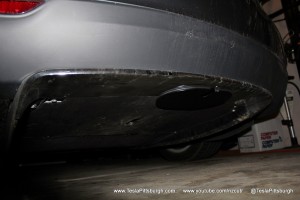 With Torklift Central’s “Undercover” in place it’s completely awesome in its subtlety, like an undercover Special Forces Operative at a gun show.
You’re packin’ just like everyone else but you have better moves.
Value on a product field of exactly ONE player can be hard to determine. At the time of this review the EcoHitch runs $350 (regardless of receiver size; one is included) and the Undercover an additional $105.
I looked into a similar hitch for a Porsche Panamera (the preferred punching bag for all Tesla owners and the sole reason why there will soon be a German translation of “Neener, neener, neener”) and found a company called Execuhitch offering a very similar product for the big VW. The Execuhitch is easily twice the cost (plus installation) but does include a wiring harness. That makes the EcoHitch a pretty good value and from a design standpoint it’s a home run.
Shops that have done prior installations will probably be your best bet– but even so, a fully installed EcoHitch should knock your credit card limit down about $850. Only as this market evolves with more competition can the value really be assessed.
Putting the EcoHitch to the Test
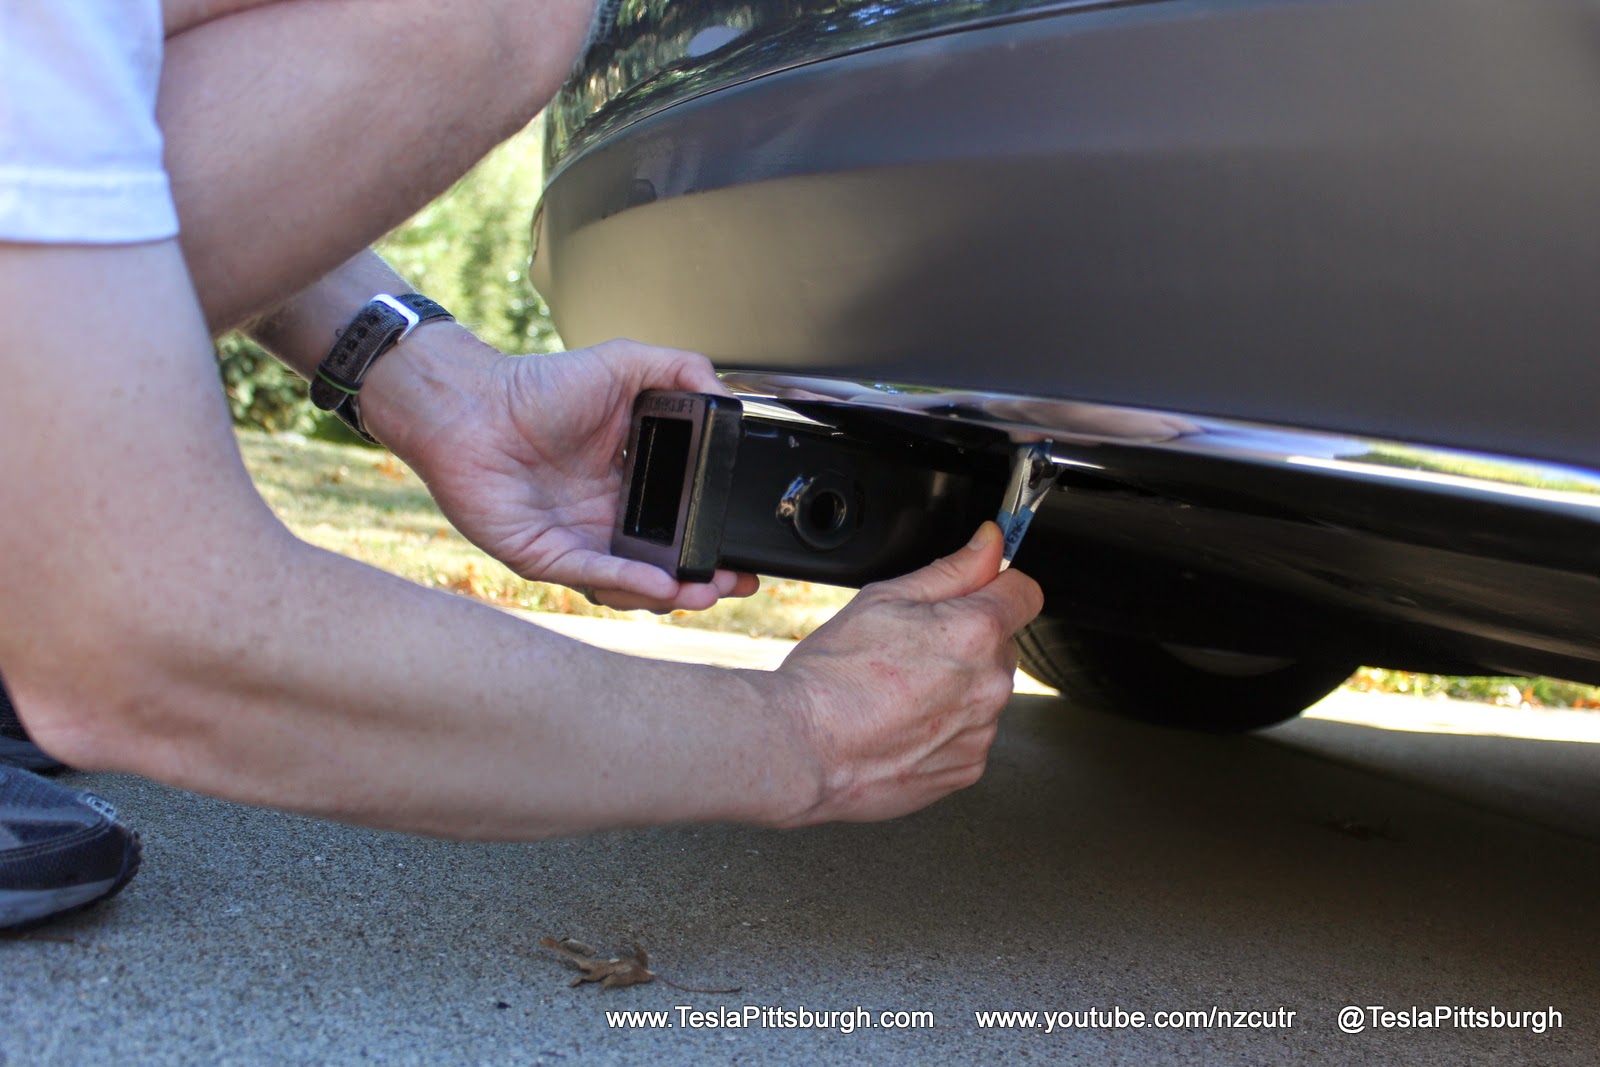 Fitting the receiver is a straightforward affair. A gentle tug allows the Undercover to slide down and out. Lift the receiver into the fitting and lock it down with the included bolts and lock washers. It takes quite a few turns to secure but this isn’t somewhere you’d want Torklift to skimp on thread. The receiver tucks in higher than the lowest hanging part of the diffuser fins but the departure angle is reduced quite a bit with a rack attached, as you would expect. The receiver itself pokes out from the bumper only slightly.
We tried fitting both a Yakima and a Thule rack to the receiver and found that both had plenty of clearance for a moving hatch when empty– but only with the Thule was there even a chance of doing so with a loaded rack. With an adult bike on the inner most position, it would knock its handlebars into the hatch– but put a smaller kid’s bike on first and you could do it.
With a rack fitted the EcoHitch receiver was making some clunks. Even with the bolt tightened there was some travel at the pin pivot point leading to clunking– which I imagined would trigger a panic attack on the highway and leave me a gelatinous mass like the pilot in “Airplane”– but once the rack’s weight was applied it jammed into position and was as quiet as a recluse’s funeral. We bounced around quite a bit of rough terrain on our outing without any noise. The rack, receiver and hitch were a rock solid unit.
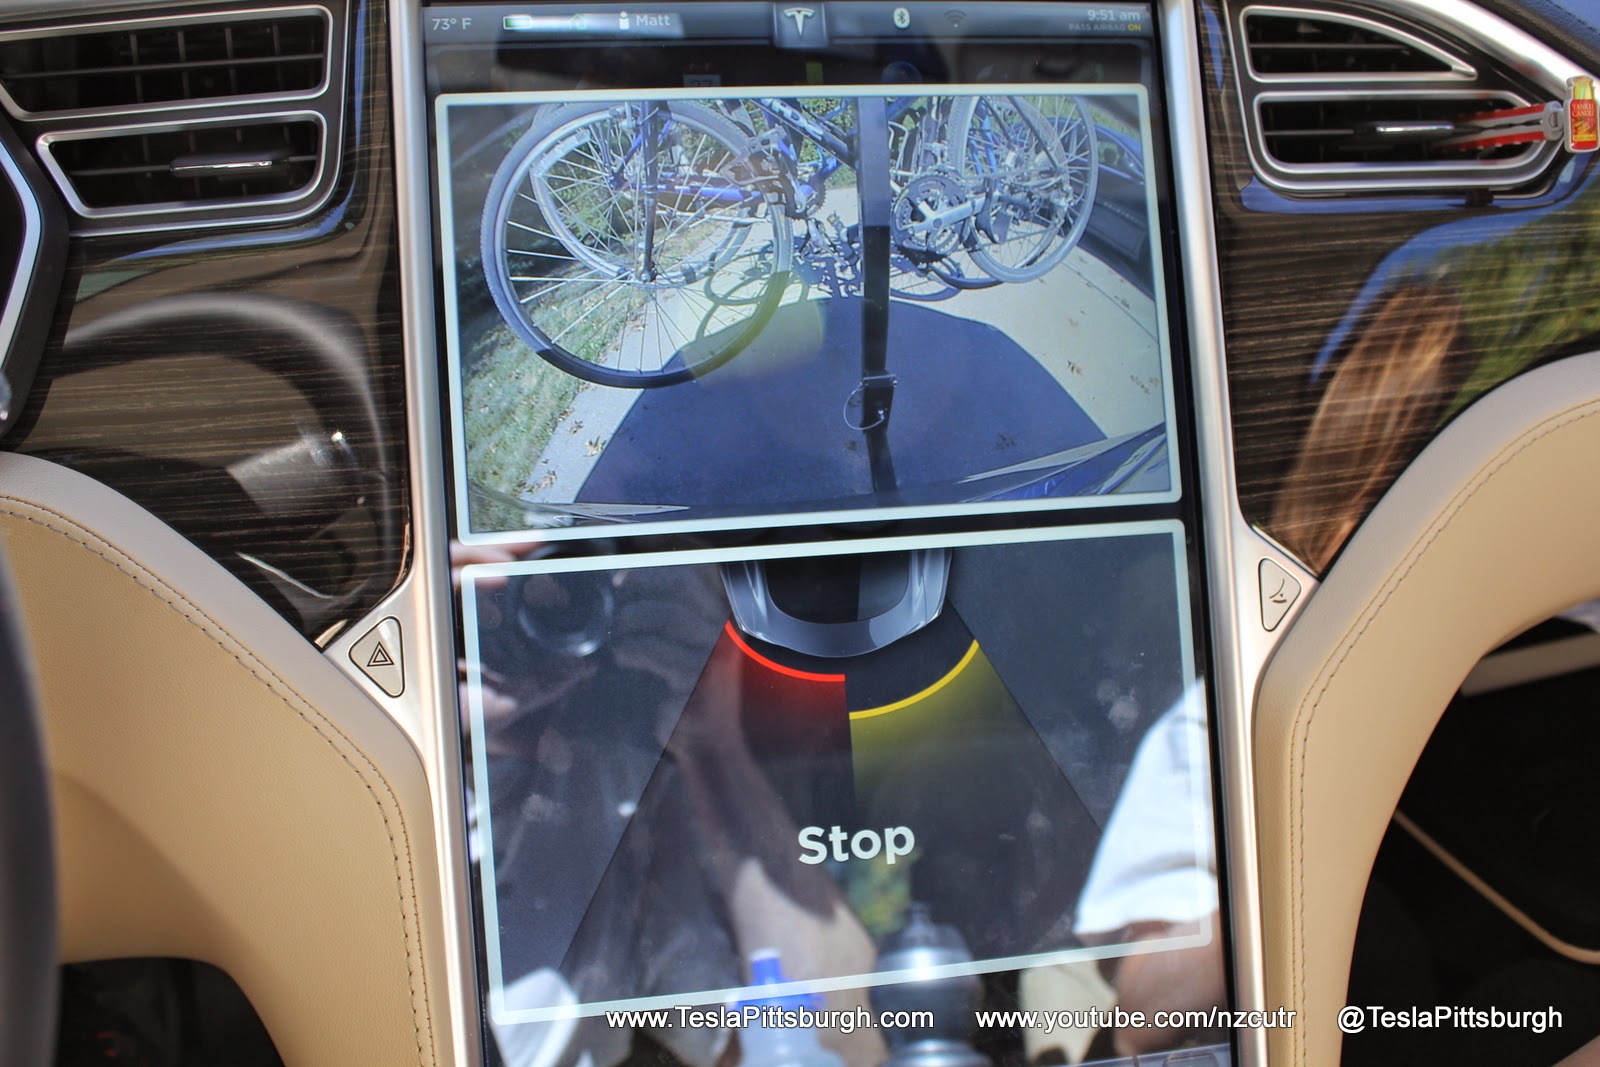
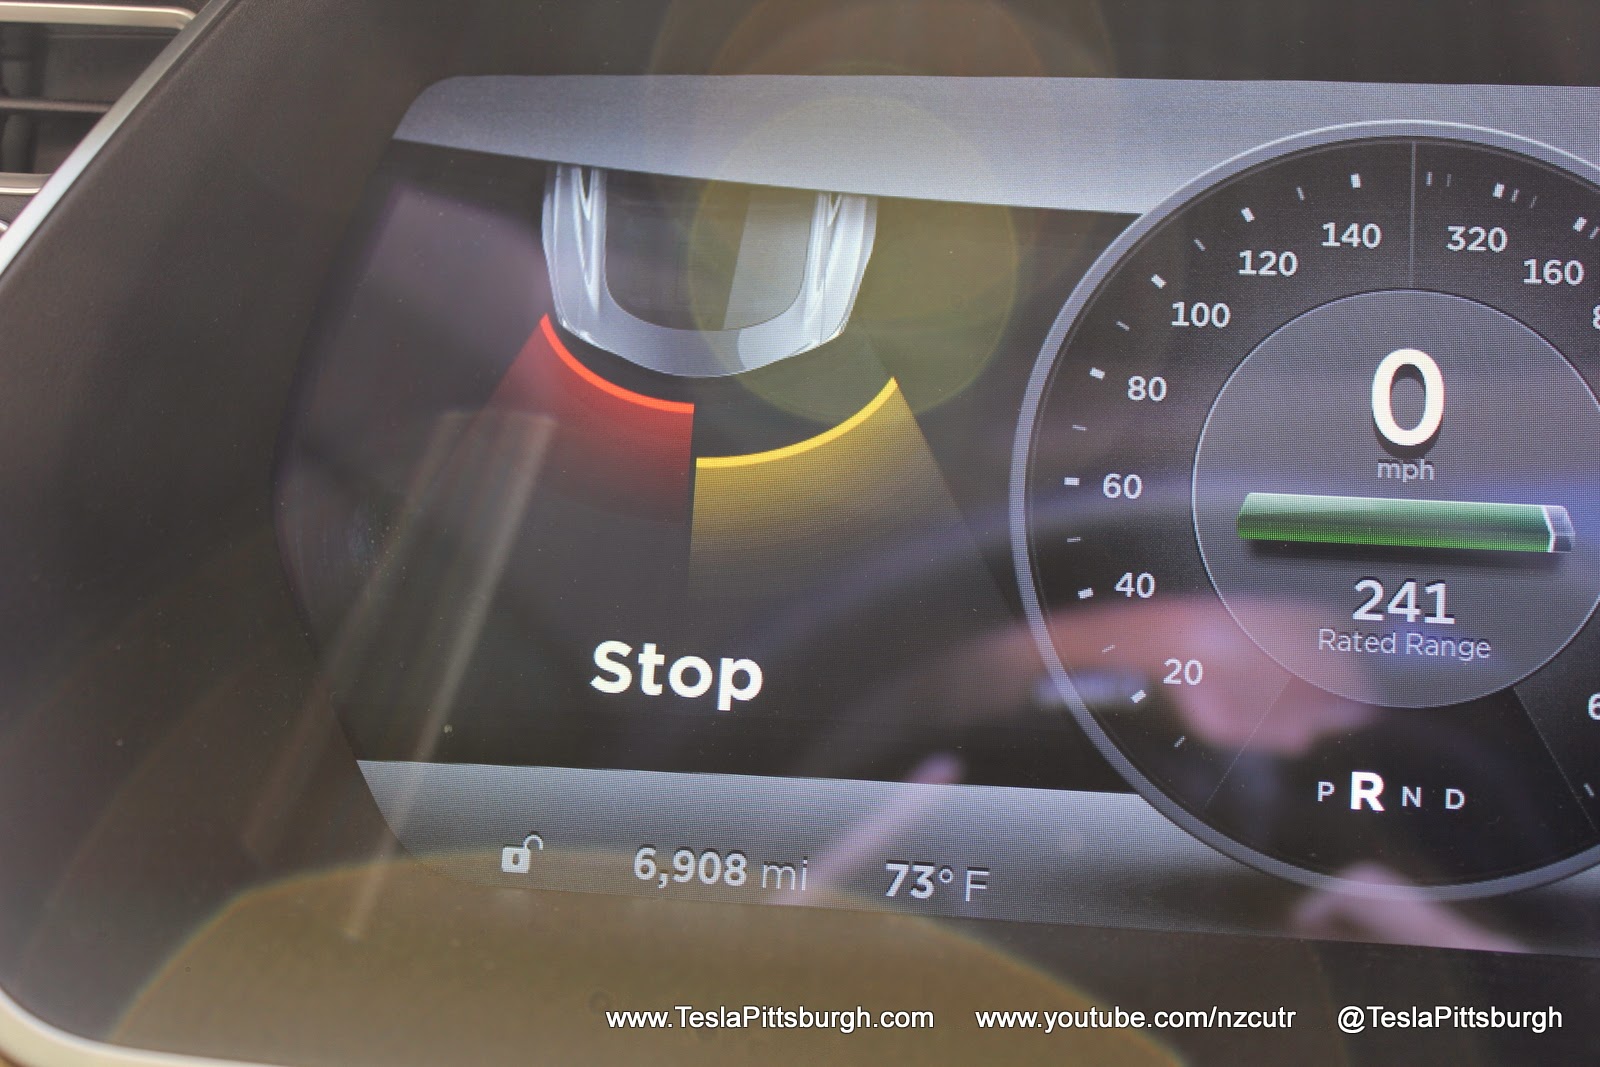
Our Model S Serena wasn’t particularly happy to be a pack mule at first. Putting her into reverse, she immediately protested and complained about obstructions surrounding her rump. All those pre-parking sensor owners are feeling pretty smug right about now while the new autopilot owners’ eyes are slowly widening. I could see an inattentive driver tuning out the chimes and backing their bikes into someone with glorious flourish, but once shifted into the drive the cacophony subsides. Popping the rear view camera on is a handy way to see you haven’t parted company with your happy wheel-spinning cargo, but that prompted more warning chimes from my wife’s side of the car… so I had to turn it off.
Torklift doesn’t make any claims regarding range impacts– nor should they– but it is the big question, isn’t it? We purposely kept to a closer trip for our first excursion and found that we were slightly exceeding the energy usage we’d experienced on the same route in slightly warmer weather.
Overall the readings weren’t bad but definitely somewhere around 60 kwh/mile higher than before. We clocked 357 Wh/mile with a cruising speed around 70 mph with 4 people and 3 bikes on board. Best I can figure, that’s an increase of about 20% over our prior trip, but slowing down a bit would nearly close the gap– which is pretty startling, really.
Summary
 If hauling bikes (or winter sporting gear) without giving yourself and your car a bump on the dome is a priority, a hitch rack is going to be your best play. For now, Torklift Central offers the only means to mount one and, quite frankly, they’ve done an astoundingly good job designing and making a rack for this niche market and should be commended for doing so without profiteering.
Their product’s quality is befitting that of the car it bolts on to. That said, The Undercover should be a standard part of the kit (or sold at cost if bundled with a hitch) and the installation is absolutely equal parts terrifying and daunting. I don’t think there is any way to more easily install anything that could match the EcoHitch’s specs but the additional costs of installation and locating a reputable place to do so should be considered as part of your purchase experience. Be forewarned– not all shops have the proper lifts to raise a car as wide as the Model S, so a visit beforehand would be wise.
Even if the market would become more crowded it’s hard to imagine anyone could improve on the design, quality or price, but the door is open a tiny crack for a good DIY solution and/or bundled wiring harness for those looking to actually tow.
The Tesla was always the best family car on the market and now with the hitch added, it can truly match wits with the typical family’s SUV.
Photo credit: TeslaPittsburgh
Back in 2019, YouTuber Simone Giertz, the self-proclaimed “Queen of Sh*tty Robots,” created a one-off Tesla Model 3 build that took the automotive world by storm. Fondly dubbed as “Truckla,” Giertz noted that the vehicle was actually her dream car — as crazy as that may sound.
Now almost four years later, the YouTuber posted an update on Truckla. And just like every other big project that one probably started, Giertz stated that she actually stopped working on Truckla when the vehicle was about 80% complete. The car is driving though, but a lot of stuff was not really working very well.
Thus, for her Truckla update, Giertz shared how most of her Model 3 pickup truck conversion was essentially completed. Truckla got a lot of detailing done, she got a slight lift, and she now has a functional tailgate. One has to admit, Truckla’s tailgate is pretty darn cool.
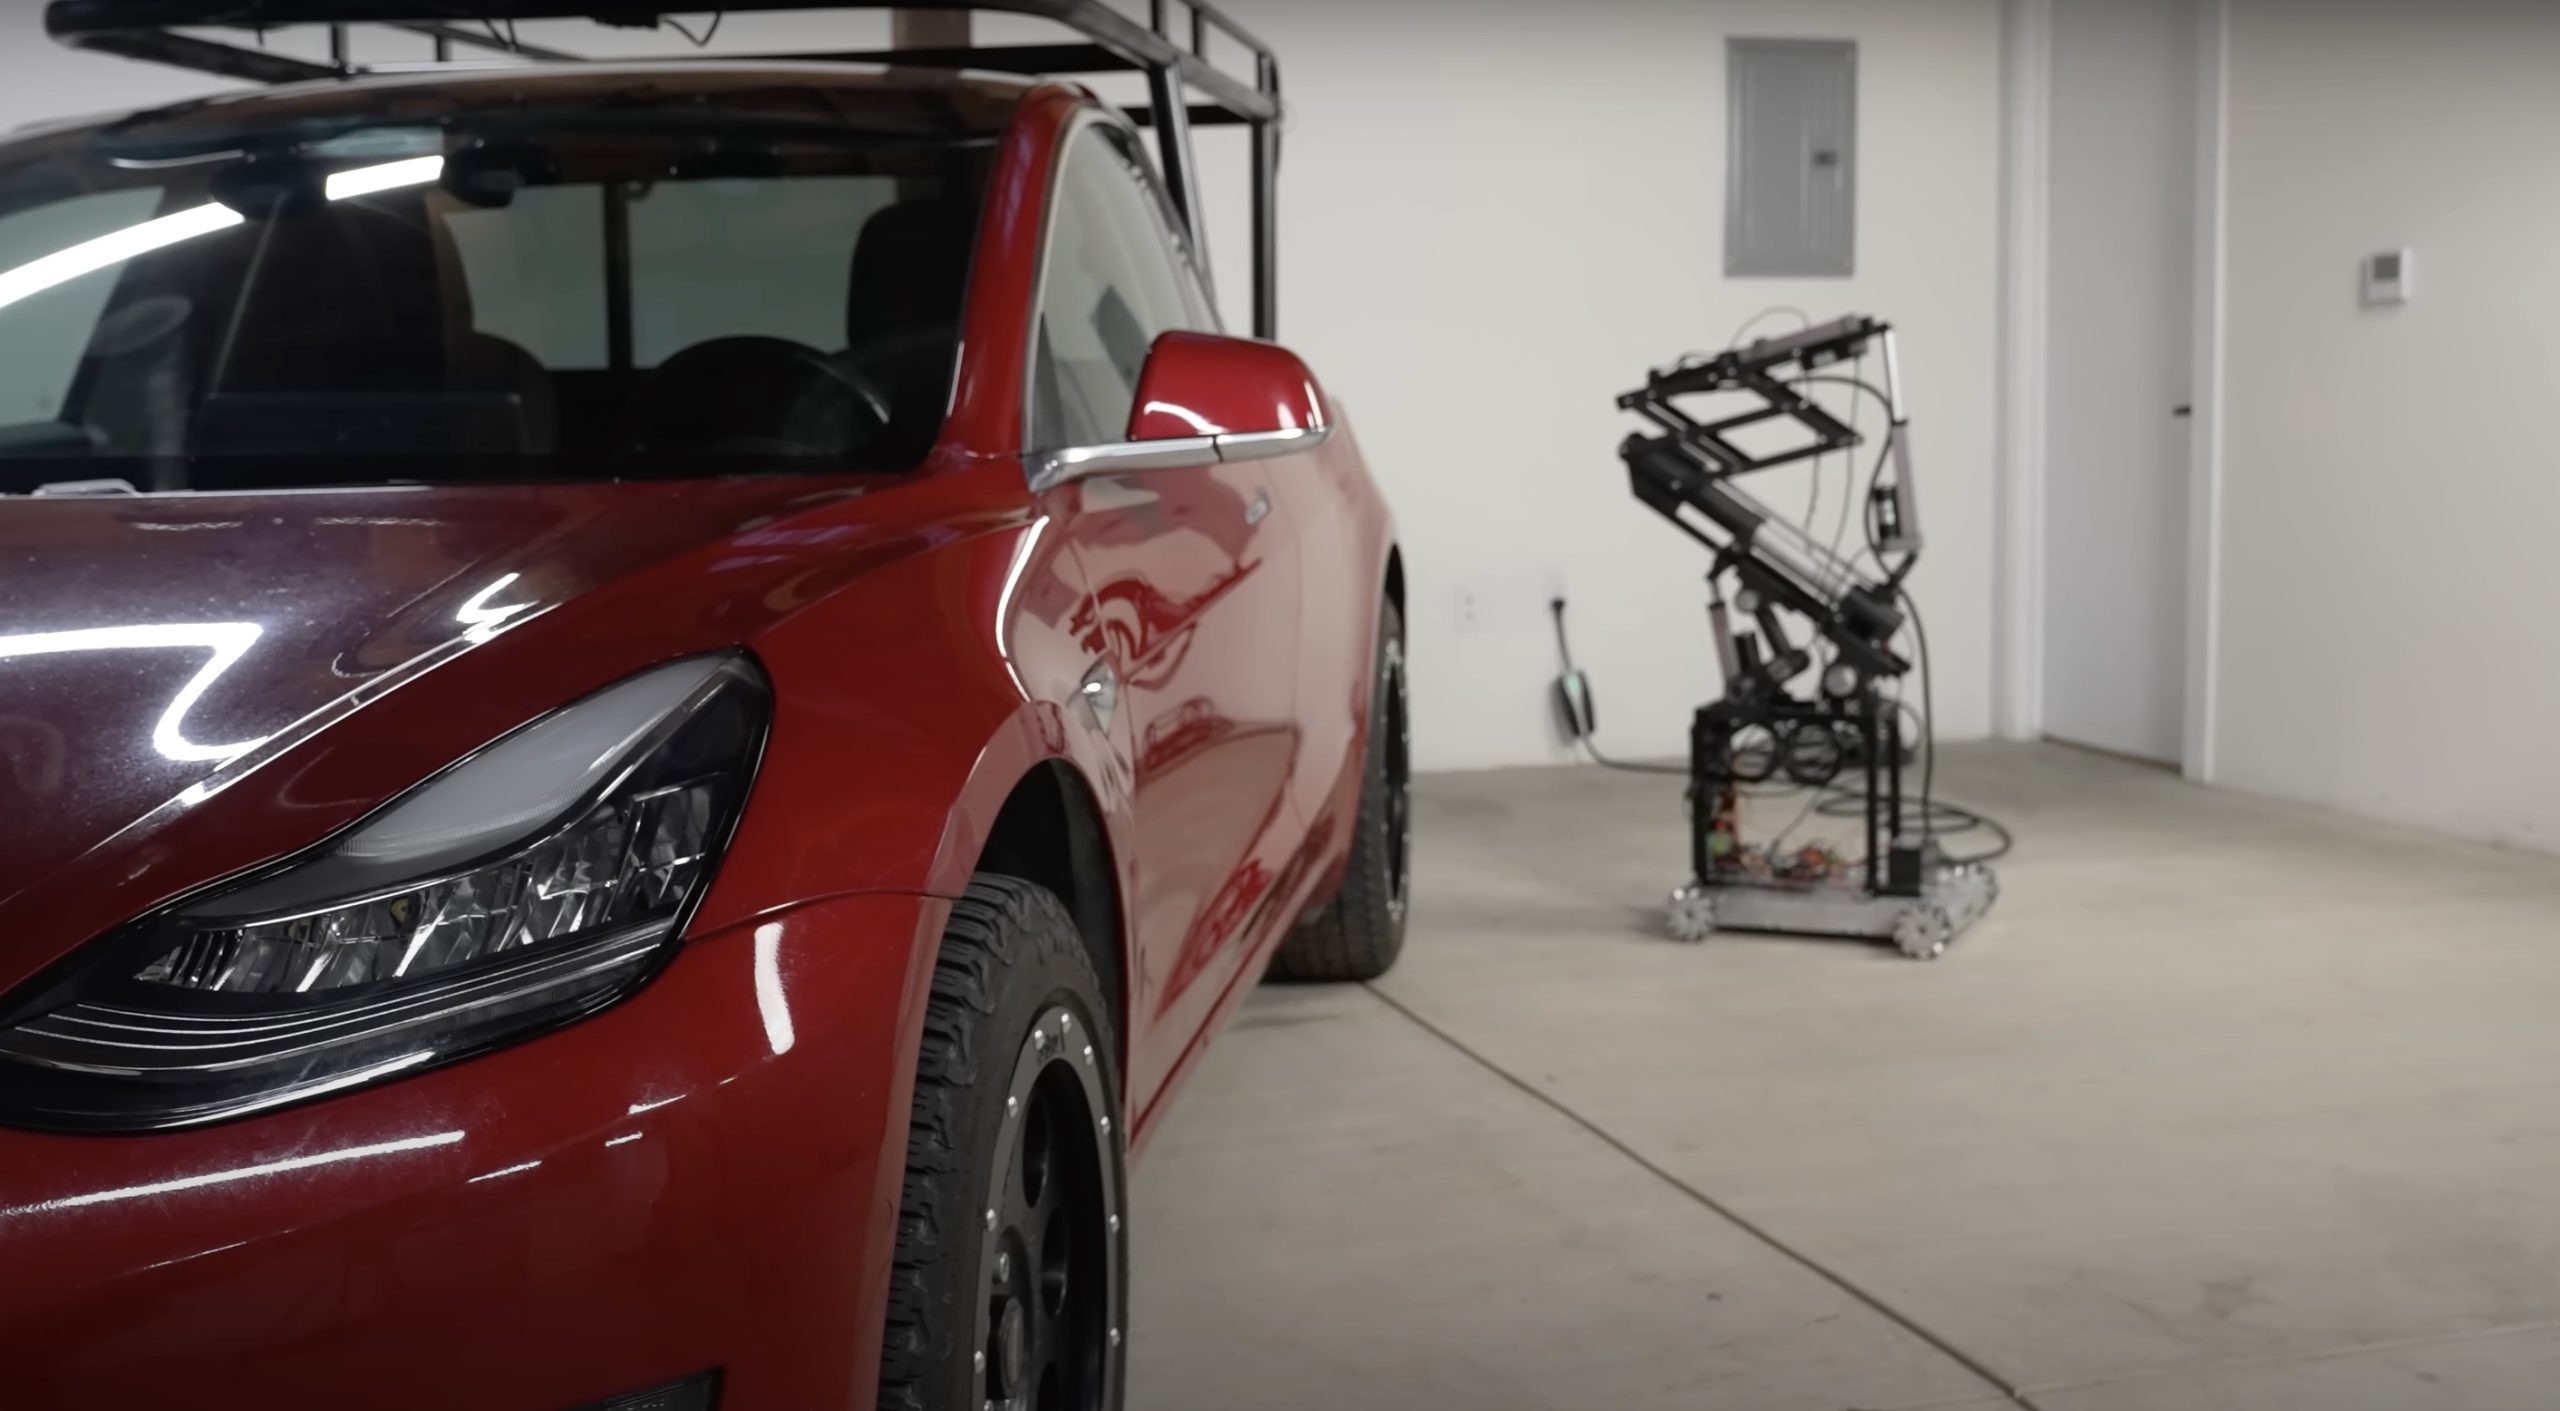
The “Queen of Sh*tty Robots” also opted to give Truckla a friend in the form of an automatic robot charger. Unlike Tesla’s rather interesting snake charger from years past, Truckla’s charger would come in the form of a rover, thanks to her friends at robotics platform Viam. Giertz aptly named Truckla’s robot charger friend “Chargela,” which is an appropriate name for such an invention.
Also true to form for Giertz, Chargela’s first encounter with Truckla was just a tiny bit awkward. One could say that Chargela may have just been a little bit nervous on his first try without human hands helping him. Most importantly, the system did work, so Giertz would likely keep using Chargela for her Model 3 pickup.
Teslas are very tech-heavy vehicles, so projects like Giertz’s Truckla are always remarkable. The fact that the Model 3 works perfectly fine despite having a good chunk of it cut off and turned into a pickup truck bed is mighty impressive any way one looks at it. Overall, Truckla will always be one of the coolest Tesla DIY projects to date, so any updates about the vehicle are always appreciated.
Truckla’s nearly four-year update can be viewed below.
Don’t hesitate to contact us with news tips. Just send a message to simon@teslarati.com to give us a heads up.
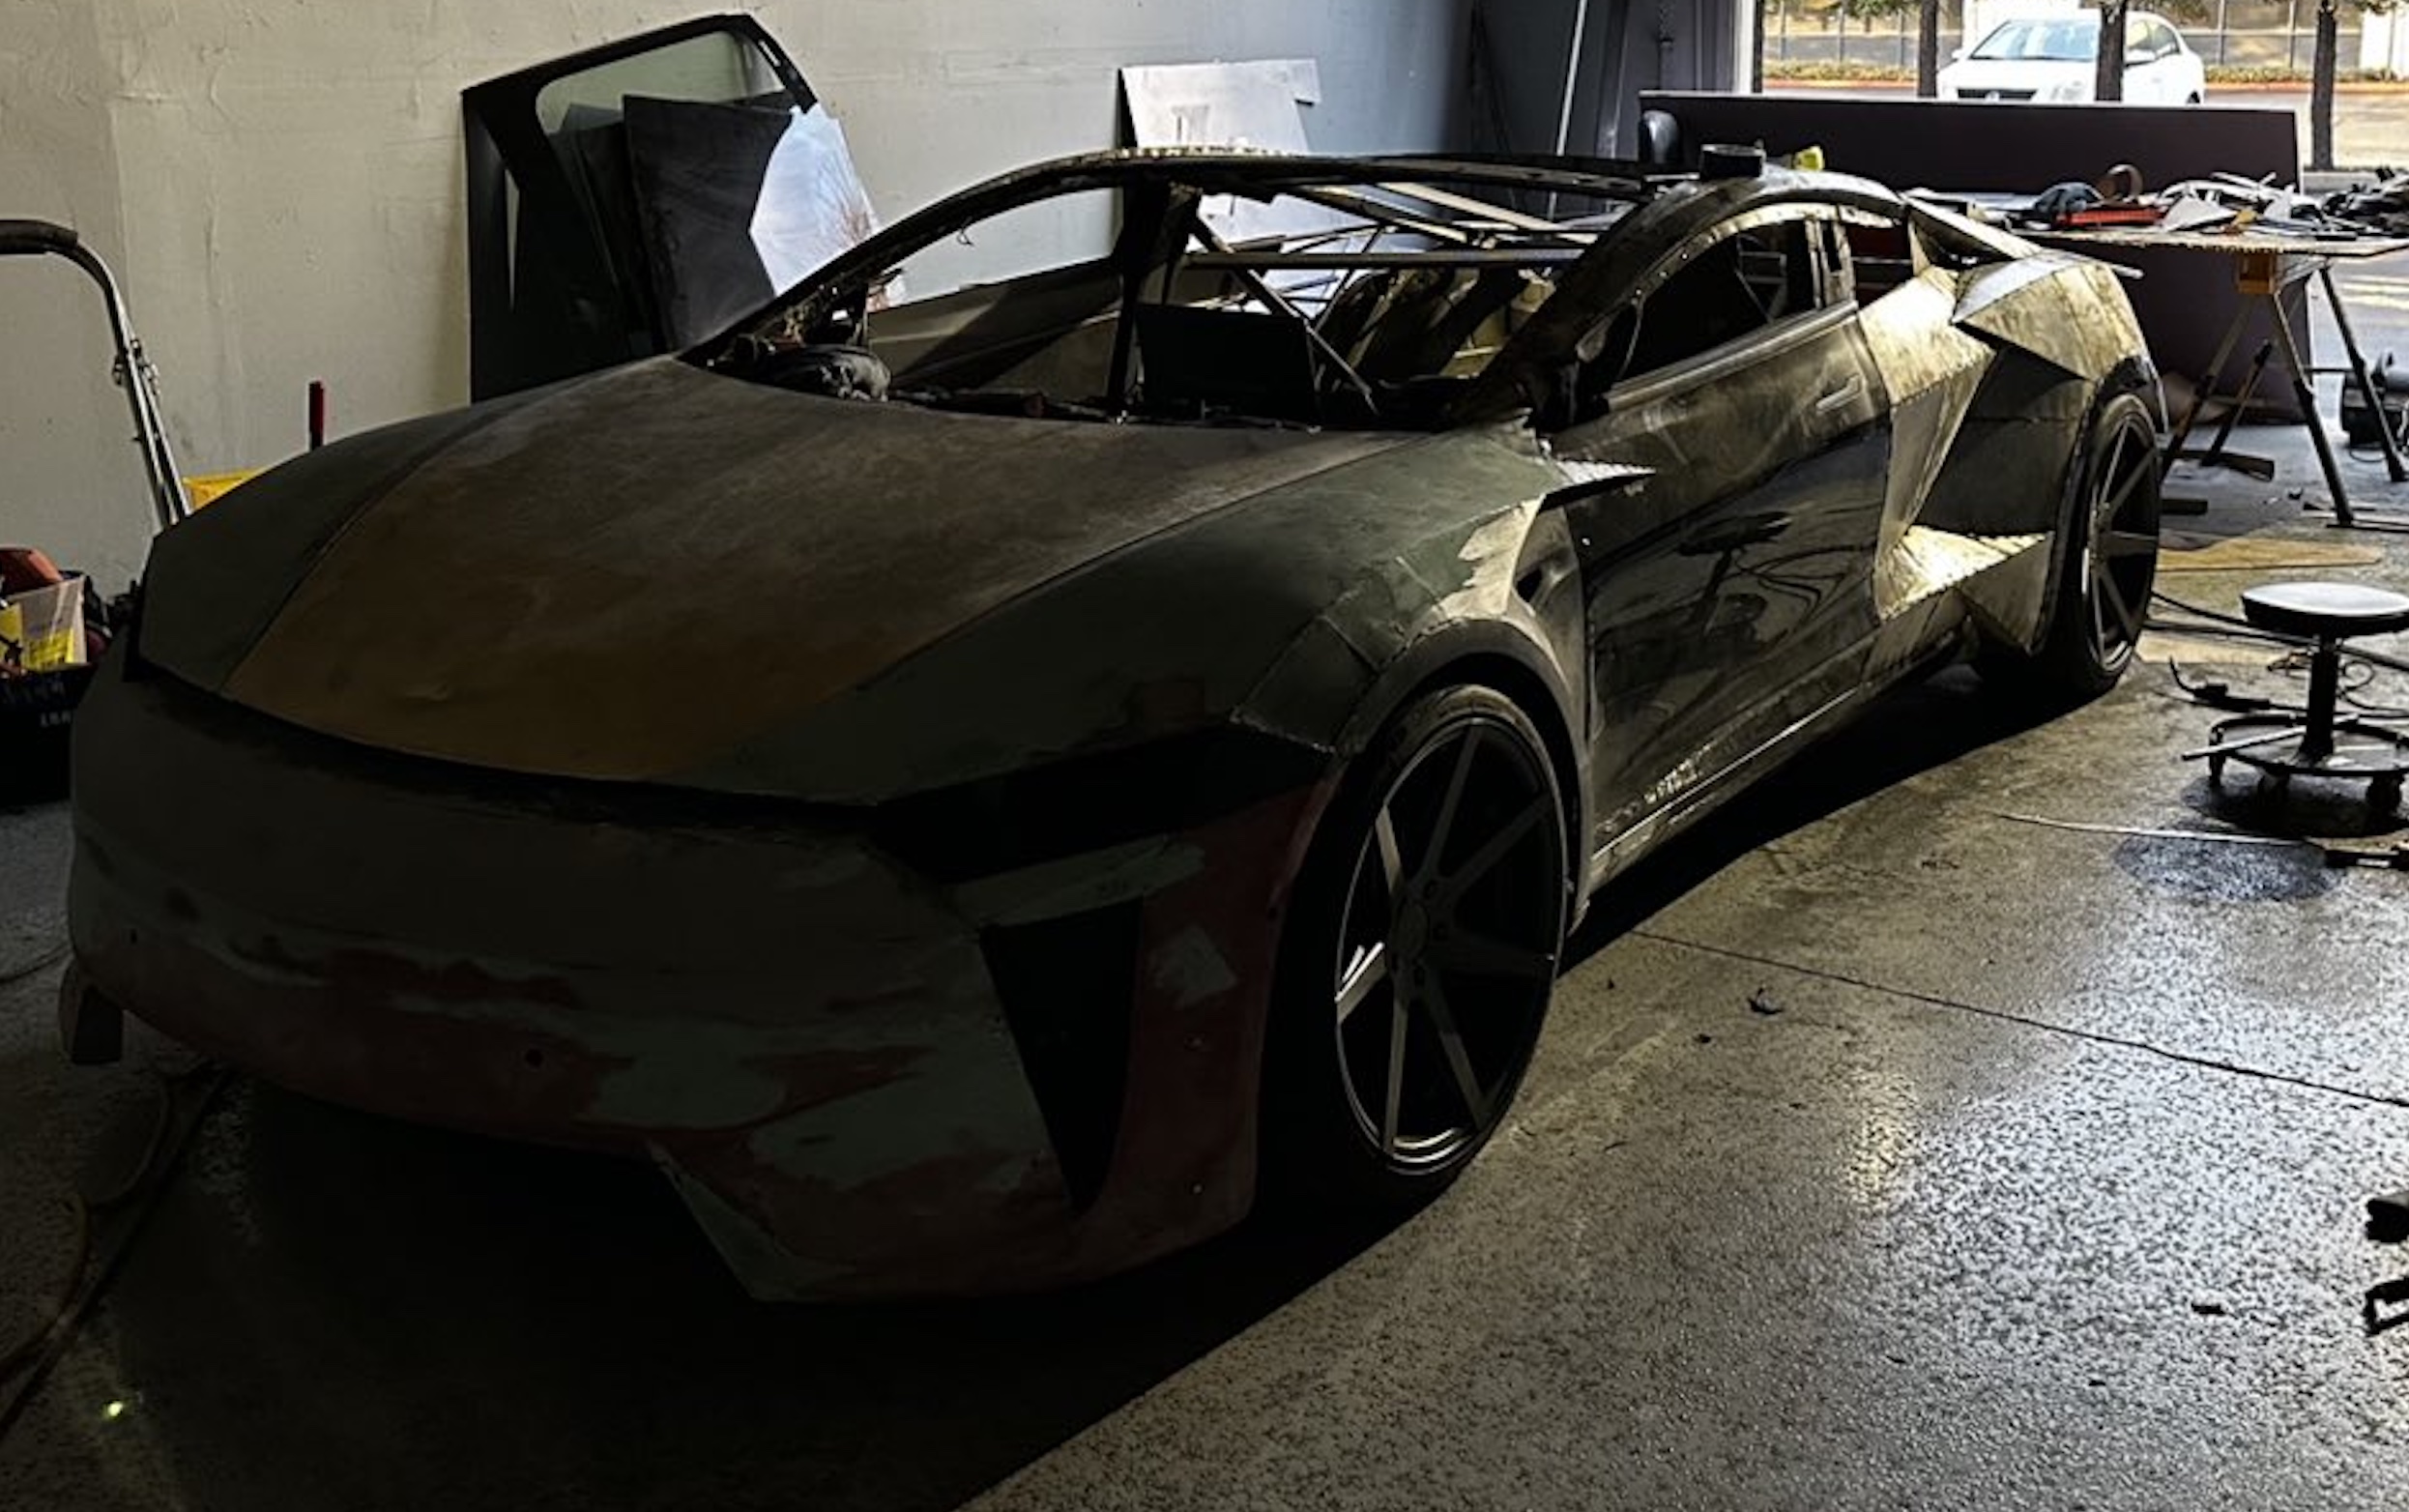
A Tesla owner is taking his hobby and love for electric vehicles to new levels by creating what could only be described as one of the coolest EV-related DIY projects to date. The idea for the project is simple: what happens when you cross a supercar with the Cybertruck? You end up with a two-seater CyberRoadster.
Tesla owner David Andreyev, who goes by the username @Cyber_Hooligan_ on Twitter, has spent the last few months creating a Cybertruck-inspired version of the next-generation Roadster made from a salvaged Model 3 Performance. Starting with a Model 3 Performance is an inspired choice, considering that it is Tesla’s first vehicle that has a dedicated Track Mode.
A look at Andreyev’s YouTube channel, which can be accessed here, shows the meticulous build that the Tesla owner has implemented on the project car. What’s particularly cool about the CyberRoadster is the fact that it’s being built with parts that are also from other Tesla vehicles, like its front bumper that came from a new Model S. Recent videos suggest that the project car’s rear bumper will be from a new Model S as well.
The journey is long for Andreyev, so the completion of the CyberRoadster will likely take some more time. Despite this, seeing the Tesla owner’s DIY journey on such an epic build is more than satisfying. And considering that the CyberRoadster is evidently a labor of love from the Tesla owner, the final results would likely be extremely worth it.
There’s a lot of crazy Tesla modifications that have been done as of late. But some, as it is with a lot of things on the internet these days, have become more silly gimmicks than serious automotive projects. Fortunately, car enthusiasts like Andreyev, who just happen to also love electric vehicles, are taking it upon themselves to create one-of-a-kind EVs that would surely capture the attention of anyone on the road.
Check out the latest video in the CyberRoadster’s creation below.
Don’t hesitate to contact us with news tips. Just send a message to simon@teslarati.com to give us a heads up.
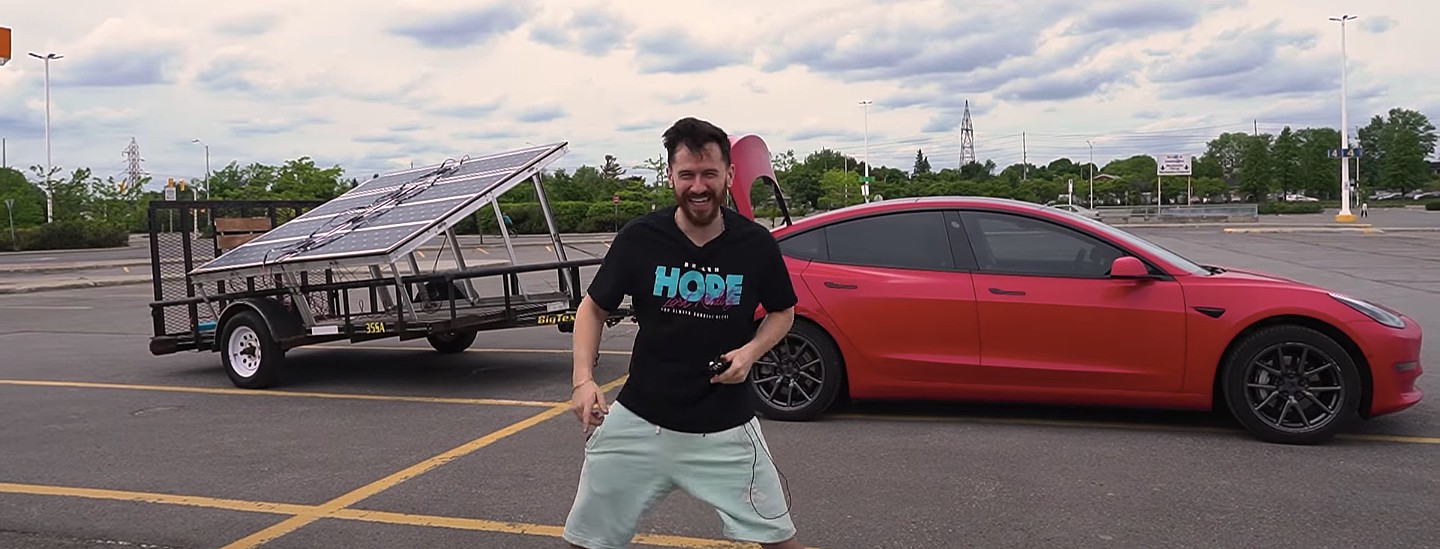
A Tesla owner has demonstrated a rather novel way to charge his Model 3. In a recent video, Sean Callaghan of the ItsYeBoi YouTube channel opted to use a series of off-the-shelf solar panel sheets onto a towable trailer to create a mobile charging unit for his all-electric sedan.
Callaghan planned to use only the sun and the solar sheets purchased from e-commerce platform Wish to charge his Model 3. The solar panel sheets would collect energy from the sun and transfer it to a control panel. The control panels were connected to batteries that would hold the energy—the batteries connected to an inverter, which would then charge the Tesla Model 3.
The entire assembly would provide the Model 3 with about 800 watts of energy on a completely sunny day. However, Callaghan shot the video when weather was overcast, so the entire solar panel trailer build only managed to provide around 300 watts throughout the YouTube host’s test.
To put this into perspective, a 100 volt home wall outlet provides 1.4 kilowatts of power, or 1,400 watts. Therefore, the 300-watt solar panel assembly built by Callaghan was producing less than 25% of the energy of a typical wall outlet. This is pretty marginal compared to Tesla’s 250-kilowatt V3 Superchargers, which provides 250,000 watts, or about 833 times as much power as the makeshift solar panel build.
However, Callaghan’s goal was not to charge the vehicle quickly. He explained the idea came from a previous video where he used a $5,000 Wish-purchased wind turbine to charge his Model 3. He wanted to test the effectiveness and efficiency of the system, which was questionable due to the time it would take to charge the battery fully.
The Model 3 battery pack is 78 kWh, and with Callaghan’s 300-watt system charging his electric vehicle, it would take 260 hours to supply the Tesla’s battery to full capacity.
In the past, electric vehicle enthusiasts have asked Tesla CEO Elon Musk why the company’s vehicles do not contain solar glass roofing, which would charge the car while the owner is driving. Musk has explained that the efficiency of this idea is challenging and likely would not provide an ample amount of range.
When asked about the idea of putting solar panels on the top of Tesla’s vehicles in 2017, Musk responded that the idea was “Not that helpful, because the actual surface of the car is not that much, and cars are often inside. The least efficient place to put solar is on the car.” It also would not be cost-effective for Tesla because “the cost of the panels and electronics, R&D and assembly would never pay for itself in the life of the vehicle, compared to charging from the wall in your garage,” Quartz noted.
That being said, Tesla plans to implement solar panels onto the motorized tonneau of the upcoming Cybertruck. The idea was discussed on Twitter when Musk stated that the optional feature would add “15 miles per day, possibly more” when parked in the sunlight. Also, fold-out solar wings could help capture enough solar energy for 30 to 40 miles a day.
Watch Sean Callaghan’s video of his makeshift solar panel trailer below.

Tesla officially begins sunset of Model S and Model X

Tesla shows off mysterious vehicle at Giga Texas

Tesla Cybertruck just won a rare and elusive crash safety honor

What is Digital Optimus? The new Tesla and xAI project explained

Elon Musk launches TERAFAB: The $25B Tesla-SpaceXAI chip factory that will rewire the AI industry


