
DIY
Tesla Model S BlackVue HD Dashcam Installation Guide
Tesla Model S BlackVue HD Dashcam Installation
If you love driving your Tesla Model S and find yourself making excuses to run errands or volunteering yourself as chauffeur to friends and family, chances are there’s good reason for you to invest in a Tesla dashcam.
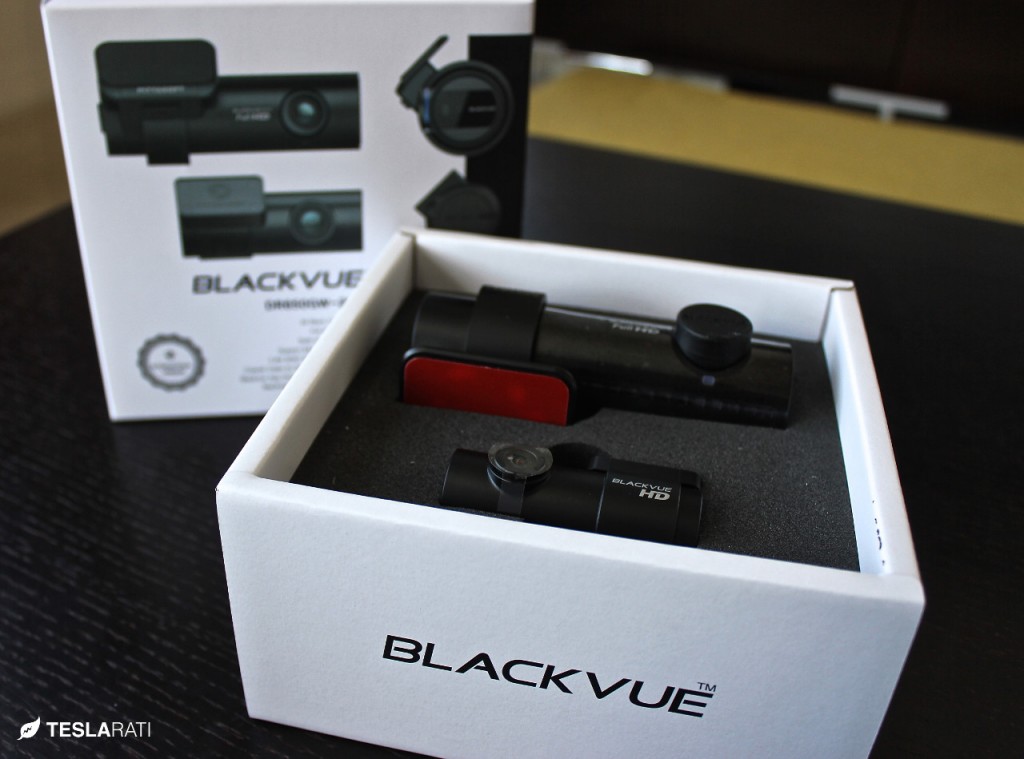
I opted for the premium BlackVue Front + Rear Full HD Camera and decided to document the steps I took to install the dashcam in hopes that it will help (and inspire) others looking to go through the same experience.
Alternatively, you can have it installed from a professional shop which may charge up to $1,200 in labor costs but I personally found it easy enough for any handy DIY type to install it on their own given the time and patience. On the “take my car apart and put it back together scale” I’d put myself pretty close to the low end of the spectrum so if I can do it you probably can too.
Here’s how I did it.
Before You Begin
Be sure to set aside approximately 4 hours of time where you can focus and not be interrupted. You won’t be able to stop mid-way and run errands. Also ensure that there’s ample lighting whether it’s being performed outdoors (for you Californians) or within a well-lit garage space.
A list of tools that I found useful for the install:
- We’re using a BlackVue DR650GW-2CH HD camera with built-in WiFi and a 64GB card (2 days worth of recording) for this installation although cheaper combinations can be found with a 16GB card.
- Assuming you want to take advantage of the BlackVue G-sensor and motion detector feature by having 24/7 surveillance (it’s amazing!), you’ll want to wire it to an always-on 12V power supply. I outlined steps I took to build a fully removable plug-n-play 12V adapter that I used for the BlackVue. NOTE: You can skip this if you just want to plug straight into the cigarette lighter in the Model S.
- Thin plastic pry tools such as this kit on Amazon for just over $3.
- A long and thin cable snake that you’ll use for feeding the BlackVue cable through tight and difficult to reach spots. A snake with the light on the end will go a long way. I found a 36″ snake on Amazon for $13 which served me well. You can also go the completely free route by using a bent wire coat hangar.
- Zip ties to neatly secure excess wire.
- Electrical tape (optional) for taping down excess wire to prevent slack rattle.
- A flashlight can be helpful at times.
Total supply cost: $25. I should mention all of the supplies can be used for other future projects too.
Planning Out the Install
Make sure you’ve read through this installation guide and have a mental map of what needs to be done before beginning. It might even be helpful to pull this page up directly from your Model S browser and have it handy during the install.
The BlackVue HD + WiFi front camera will mount directly under your rear-view mirror. Two cables will attach to the camera – 1) a power supply cord 2) a cable that connects the front camera with the rear camera. If you chose to go with the 12V plug-n-play solution that I wrote about, then the path to route cables is towards the driver’s side of the vehicle. If you decide to use the 12V cigarette lighter outlet then you can run the power cable in any direction that you see fit.
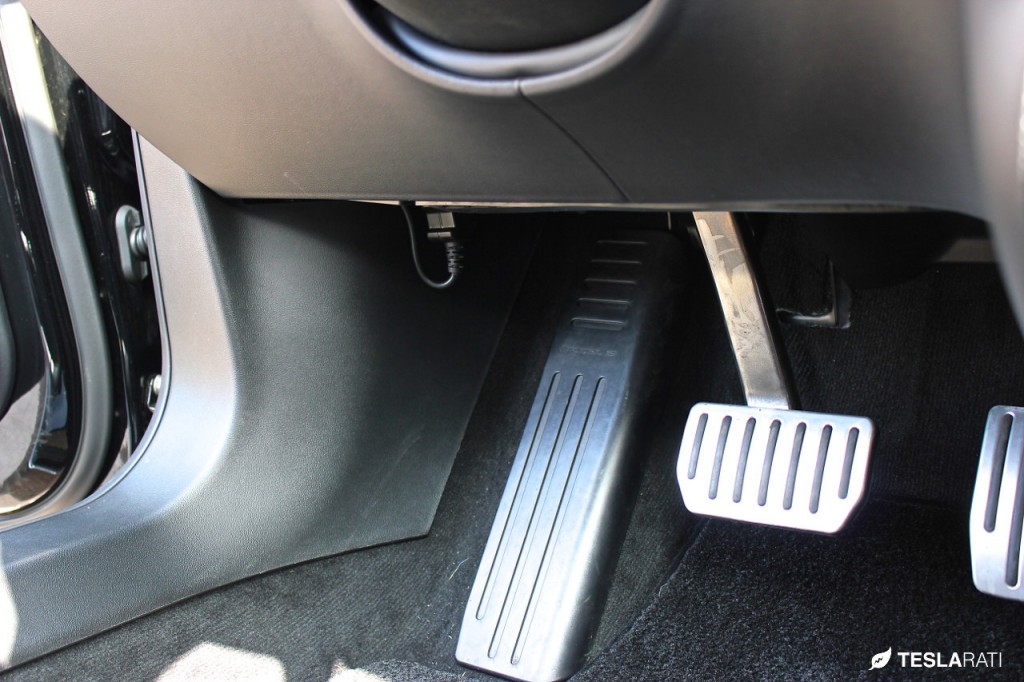
Removable plug-n-play 12V power adapter attaches directly to the OBD-II port situated above the dead pedal.
For those who will be installing this on right hand drive models, all you’ll need to do is reverse my instructions where appropriate.
The next thing you’ll need to figure out is whether you want to spend the time and hide the cables completely or just make them difficult to see. The simpler and easier approach will be to route the cables along the top of the windshield as outlined in our DIY Tesla single channel dashcam post. But since we’re dealing with dual cameras with the BlackVue DR650GW, you’ll need to apply either approach to two cables as opposed to one.
This installation guide will be outlining the steps I took to completely hide the wires from view.
My plan was to go under the plastic behind the rear view mirror and directly into the headliner, and then take a turn towards the driver’s side visor before popping back out of the headliner. I will then run the cable down the plastic trim adjoining the weather stripping to the left of the dash and connect to the OBD-II plug above the dead pedal using my removable 12V power adapter plug. The other cable for the rear camera would be routed along the headliner leading all the way to the trunk.
Step 1 – Gain Access
The first step is to gain access to all of the areas that you’ll be working on. If you have the pano roof option then open it all the way which will give you ample headroom to work in. All of the areas that you’ll need to gain access to involve removal of plastic panels held on by plastic clips. If the thought of accidentally breaking one frightens you (although we’ll outline all of the areas to look out for), then I’d recommend going to a professional installer.
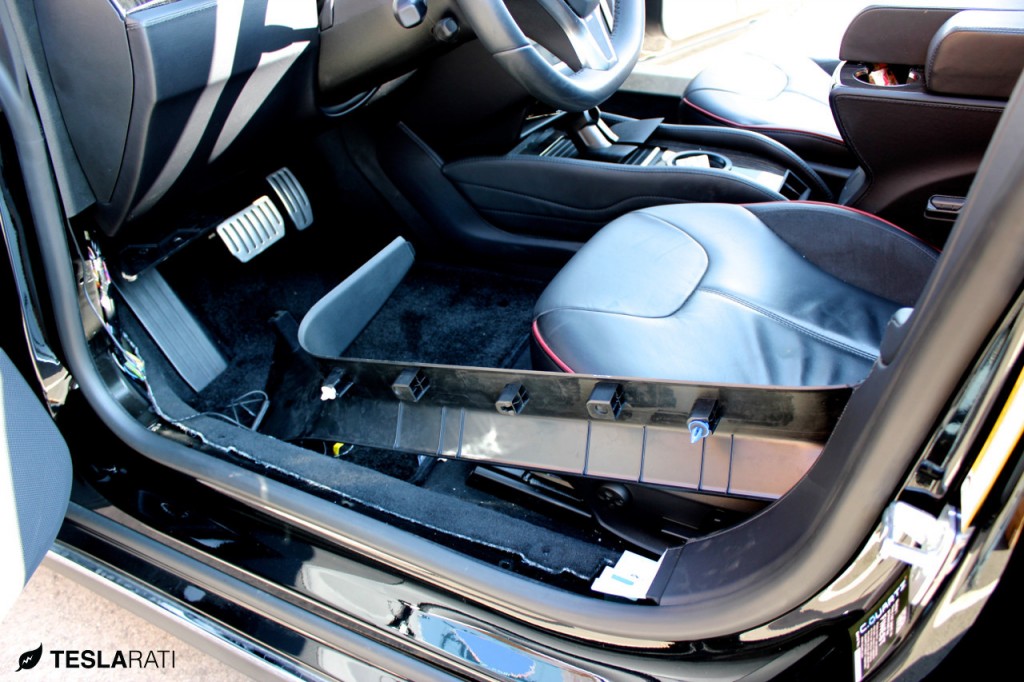
Doorstep / footwell plastic trim: This trim is held on by plastic clips that snaps directly into the floor of the vehicle. Grip the plastic trim firmly and pull directly up from the location where the plastic clips are. They will pop right off with a loud noise so don’t be alarmed. The clips are pretty sturdy and I can’t imagine anyone being able to break these. This is a large plastic trim that covers all the cables at the front left of the footwell.
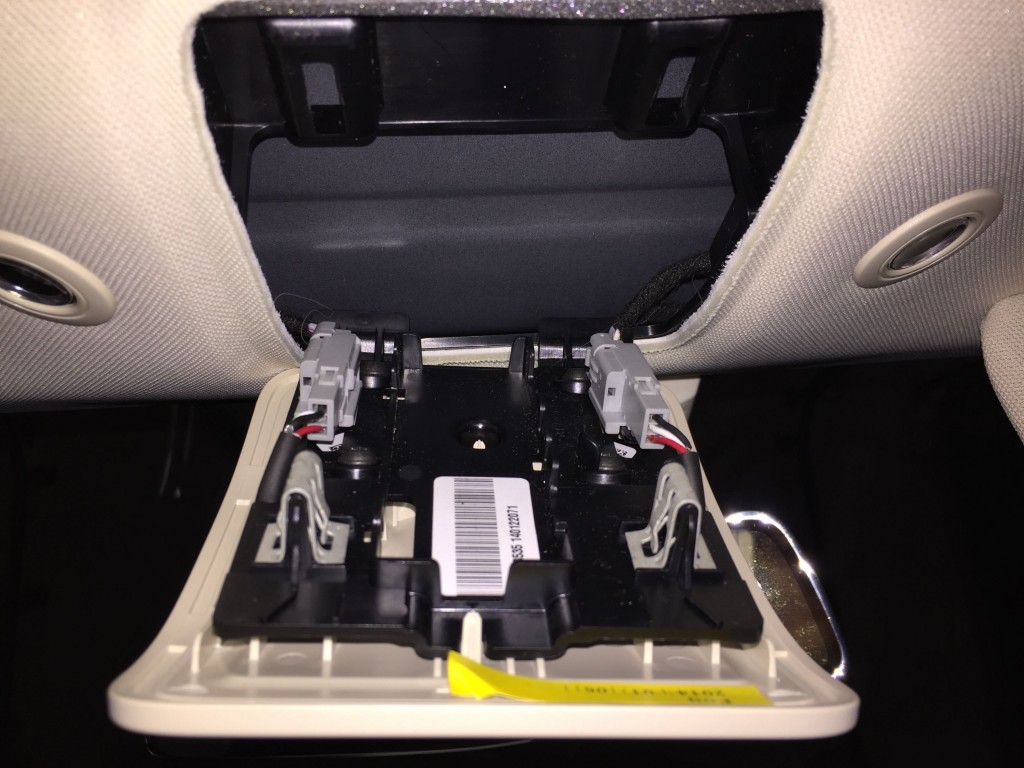
Headliner / Microphone grill (directly above the touchscreen): Grip the edge closest to you (not the windshield side) and pull down. The grill will pop out and swing down. These are strong metal clips which I opened and closed several times without any concern of it ever breaking.
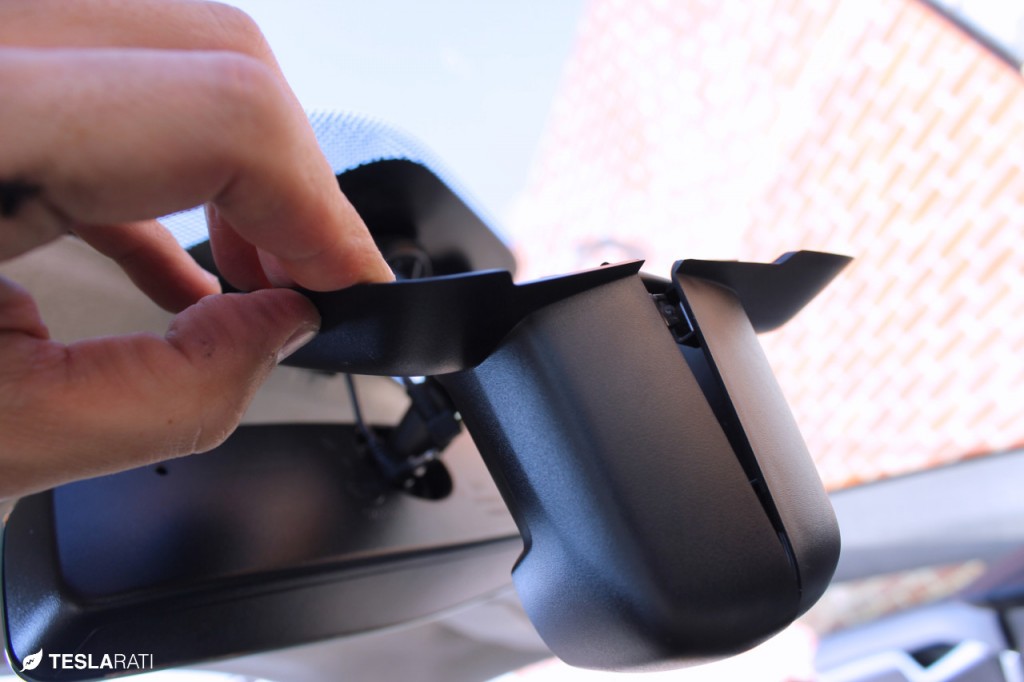
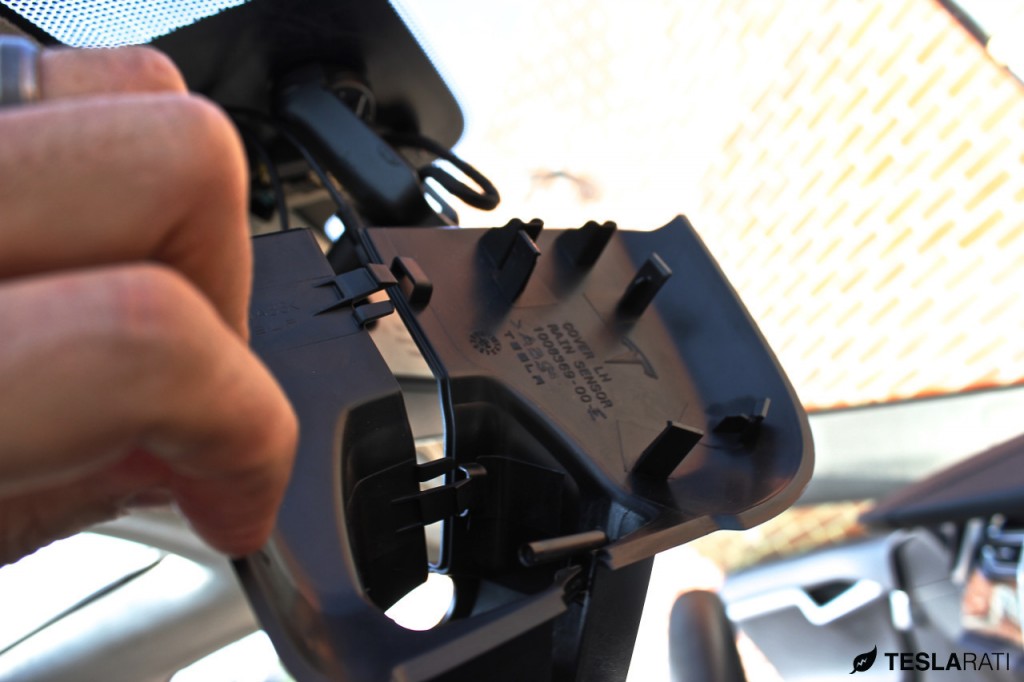
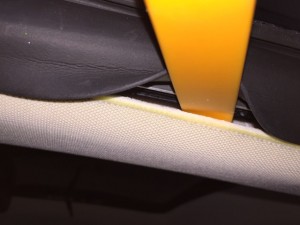
Rear-view mirror base cover: There is a black plastic cover that hides the mounting hardware for the rear-view mirror. This one was a bit more difficult to remove because of the tight fit but also the delicate nature of the thin plastic clips. I managed to break one of the clips although it didn’t affect reassembly. Hopefully these detailed photos will give you an idea of how the plastic cover is attached to the mirror so you can remove it carefully without breaking the same clip I did.
Pull from the edge that touches the windshield very gently and slowly. The plastic pry tools help here as you’ll need a way to wedge between the thin and sharp plastic trim and the glass.
With the plastic base cover removed you can see that it’s held together by plastic tabs that “sandwich” the two halves together. The two plastic halves wrap around the base mounting fixture of the rear-view mirror.
Step 2 – Run cables to BlackVue Front HD Dashcam
The cable between the front and rear dashcams has two small identical connectors on either end so you’ll be able to feed that cable in any direction without concern of routing it from the wrong end. The power cable for the front dashcam has a large male 12V plug on one end which you won’t be able to feed through the headliner. This means you’ll have to start routing the cable starting from the bottom of the footwell (where our 12V power source is) and route the cable upwards through the weather stripping adjoining the door and up into the headliner.
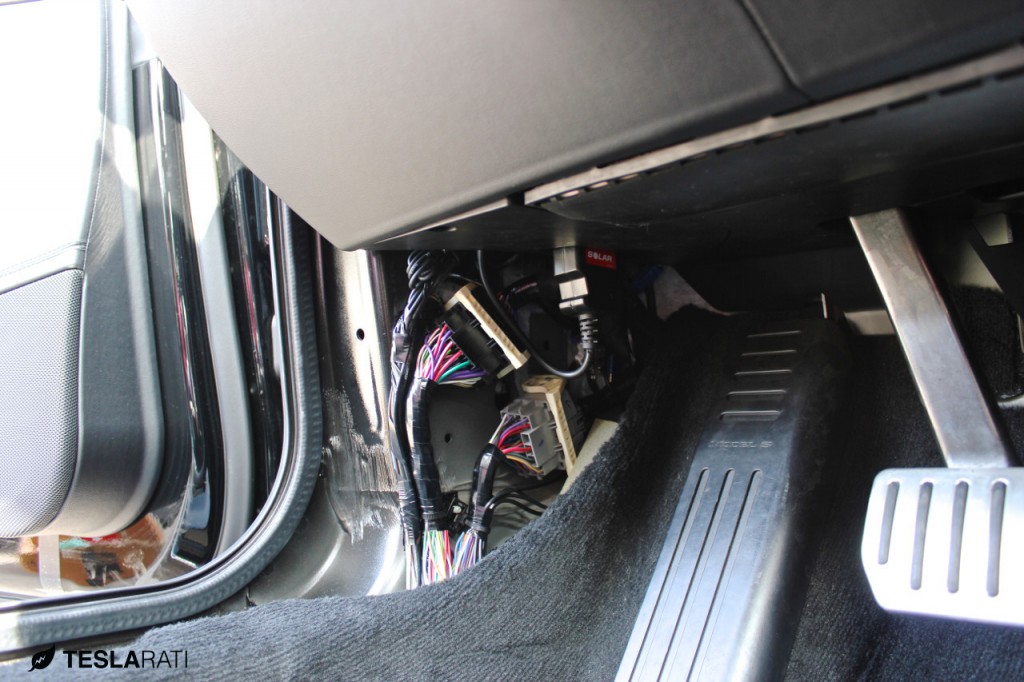
Routing the BlackVue front camera 12V power cable from the bottom footwell and up alongside the weather stripping before passing through the headliner.
You can easily tuck the cable under the rubber weather stripping but may need to use the flexible wire snake from above and pull it through a few tight spots. Routing the cable cleanly up to the upper edge of the driver’s side is not difficult at all. Once you get to that point, add the second cable (for the rear dashcam) as both cables need to connect to the front camera to be mounted near the rear-view mirror.
Now this is where things get tricky and frankly where I spent nearly 50% of my time. It’s definitely the most difficult part of the entire install since you’ll need to run both cables (one at a time) from the left driver’s side headliner all the way to the headliner grill.
Pushing the cable though the various curves, bends and headliner foam will take some patience, a lot of lighting and did I mention patience? I was unable to push the wire snake through the headliner so I opted to use a bent coat hangar to find my way through a small opening between the headliner (looking in from outside of the vehicle and above the top portion of the driver’s side window) to the front of the pano roof.
I used electrical tape to secure the right angle power plug (the end that attaches to the front dashcam) to the coat hangar and pushed it through the opening I found in the headliner. This is the “push approach”.
Another approach, the “pull approach”, can be done where you feed something similar to a weed eater string from the pano roof track through the tight turns within the headliner, and just enough so it can be grabbed from the other side. Once it pokes out, zip tie (or tape) the 12v right angle plug to the weed eater string and pull it through the headliner.
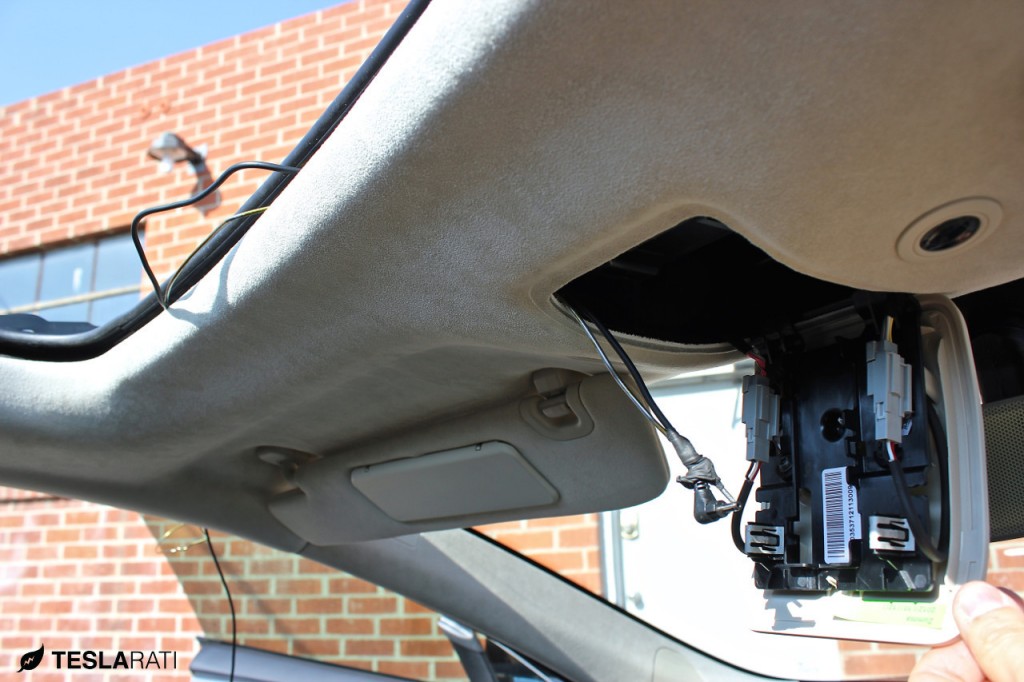
BlackVue right angle power cable being run from the outer driver’s side window edge of the headliner to the center microphone grill using the “push approach”.
Breathe a sigh of relief once you get the cable pushed or pulled through to the center headliner microphone grill. The hardest part is done.
By now you should have both the right angle 12V power cable and the rear view camera cable converging towards the rear view mirror. Push them straight through under the little bit of headliner between the grill and the windshield. The cable snake helped here. Tesla also designed a small gap which allows cables to run through without being pinched against the windshield.
Step 3 – Mount BlackVue Front HD Dashcam
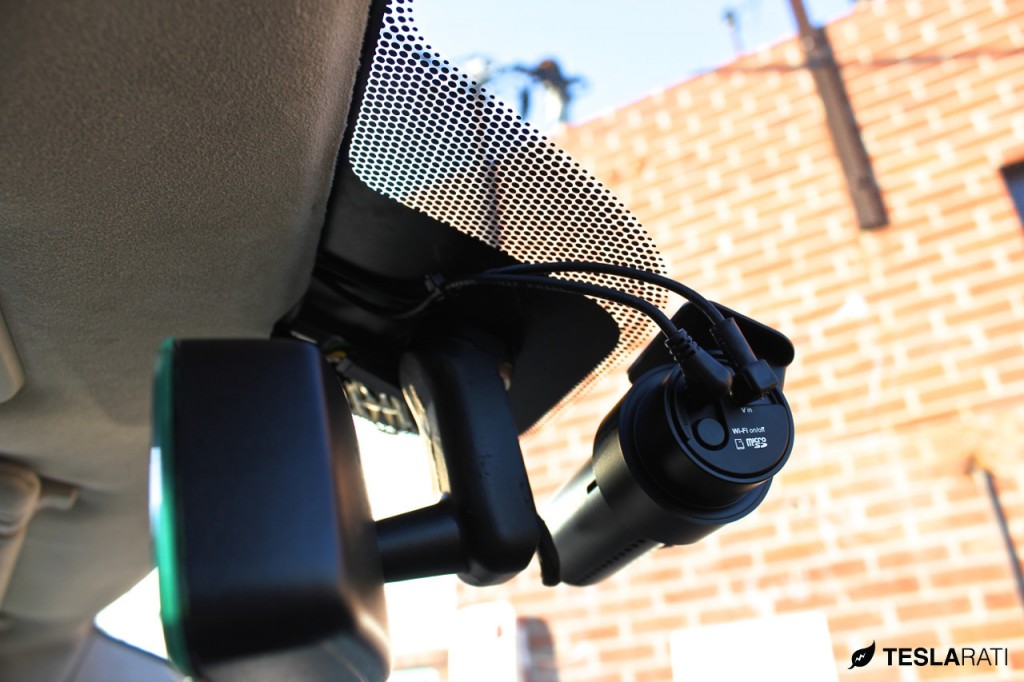
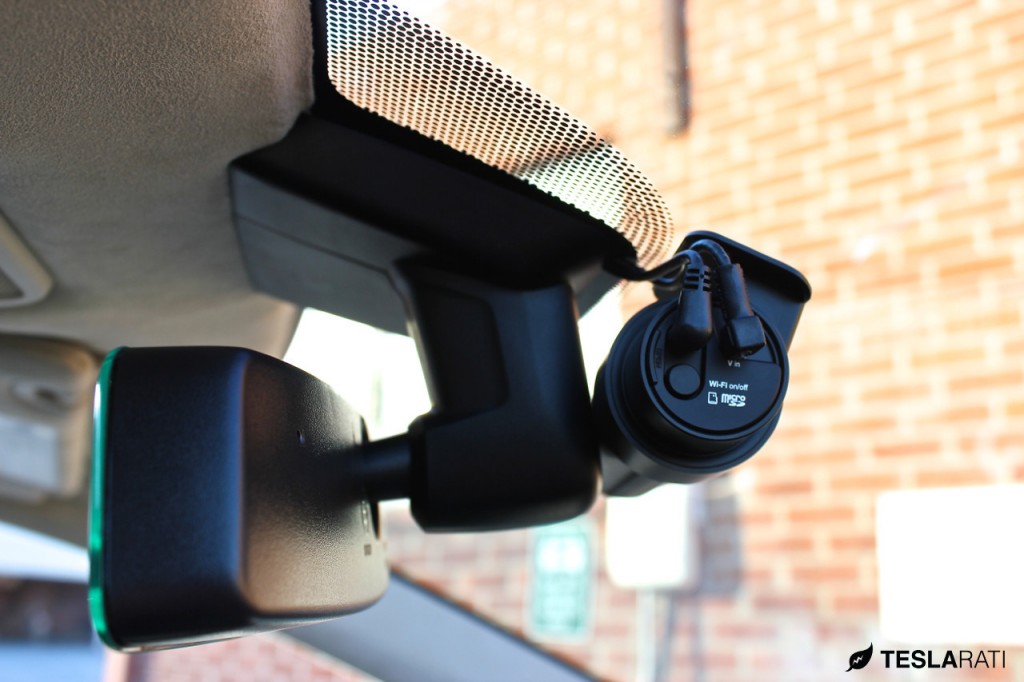
With the cables in place you can now mount the front dashcam to the windshield. I cleaned the windshield with some rubbing alcohol to ensure a super clean surface before attaching the 3M adhesive backing of the front cam to the windshield. I mounted it right below the dark portion of base covering while making sure the camera and the rear view mirror mount did not touch.
NOTE: The adhesive backing is extremely sticky so you’ll only have one shot to get this lined up correctly.
Mounting it in this location will ensure that the front dashcam is not visible from either the driver’s or passenger’s seat.
Attach the cables to the camera and ensure to remove any slack from the cable. I zip tied the two cables together to keep it as tidy as possible. I then re-attached the rear-view mirror base cover and flipped up the headliner microphone grill.
The end result should look as if the BlackVue dashcam was built into the Tesla Model S. It’s sleek and stylish appearance blends perfectly into the mirror cover.
Step 4 – Route cable to rear dashcam
 If you’re following along then you should have only one cable remaining that’s coming out of the headliner at the left side where you fed the front camera power cord through.
Route the cable alongside the headliner while tucking it between the rubber weather stripping and headliner as you work your way to the rear.
When you get to the pillar between the front and rear seats, as well as the point between the rear and the hatch, you’ll use your pry tool and tuck the cables between the seams before routing it back up into the headliner. You’ll eventually come out of the headliner at the left rear corner of the car.
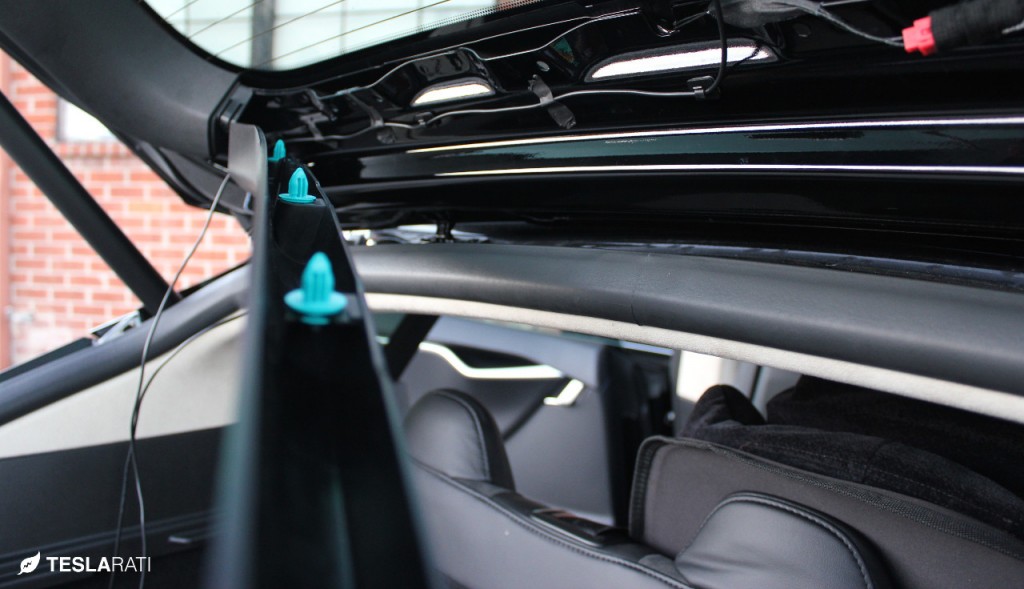
Here a new challenge awaits. Since the rear hatch is hinged you’ll have to figure out a way to jump the gap between the inside of the vehicle and the inside of the hatch. There’s a bundle of cables fed through a thick rubber grommet but it’s all sealed up. I poked at it for a while in hopes I can somehow feed the BlackVue rear camera cable through it but found no way to do so.
Because the wire is black and relatively unnoticeable, I decided to just jump the gap with the cable. The cable is hardly noticeable with the hatch open and completely invisible when closed. It is the only place throughout the entire install where you’ll catch a small glimpse of the wire if you know to look for it. I’m very picky about clean installs yet this hasn’t bothered me a bit.
Please leave your comments below if you happen to know of a different approach!
The next step is to route the cable along to the middle of the window. The horizontal plastic strip along the upper portion of the hatch pulls straight out and easily. No concerns about breaking and clips since these are extremely durable. The BlackVue comes with 3M backed wire clips which I used to keep the wires secured to the aluminum frame of the hatch. I used electrical tape to further secure the cable to the hatch in order to prevent any sort of rattling should the wire tap against the plastic trim due to road vibration.
Step 5 – Attach rear view camera
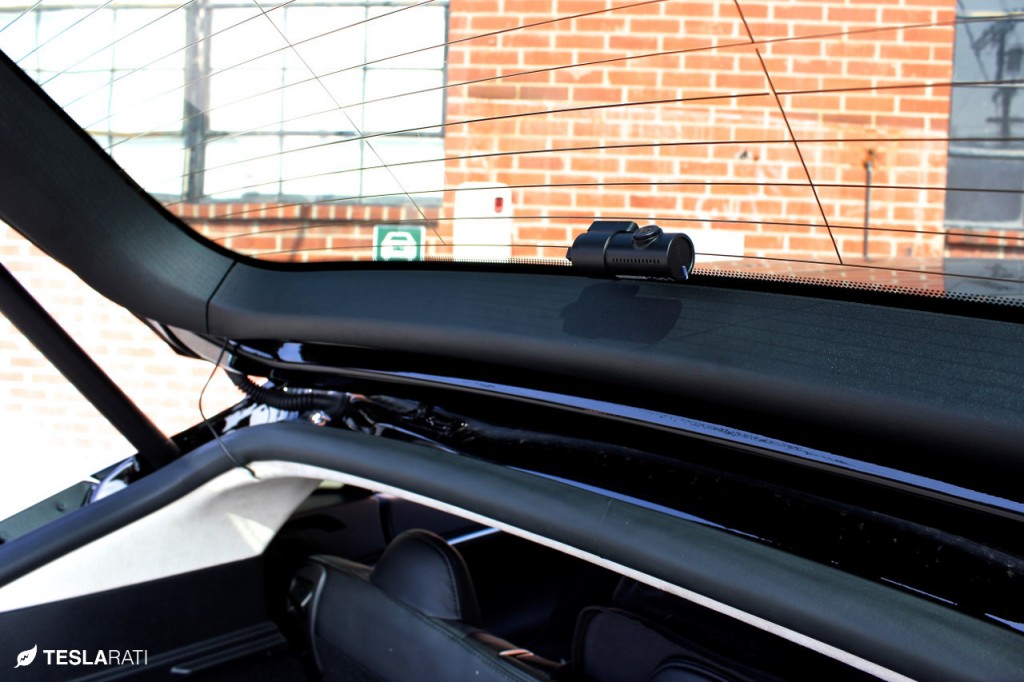
Clean the glass of the rear hatch and attach the rear view camera close to the edge of the plastic trim without touching it. Make sure you have the camera facing in the correct direction and not upside down. The power cable should come in from the left as you’re looking at the camera from the rear.
Once the cable is connected to the BlackVue rear camera, you’ll find that you have a lot of cable slack. Neatly bundle it up and secure it via zip ties to either another set of cables or tuck it away somewhere. I tucked mine into the driver’s side headliner but anywhere would suffice.
Step 6 – Power up and configure
Finally, to the fun part! Power up and configure the camera through BlackVue’s software which can be downloaded directly from their site (camera Firmware | smartphone app and desktop software).
I’d recommend turning off the camera’s voice response and indicator light to give it the ultimate stealthy look. This is especially useful if you plan on having 24/7 surveillance of your Tesla Model S as it won’t alert others that there’s a camera in action. You may also want to shut off the audio recording at this time. It may be illegal to record someone’s voice without their consent so please check with your local laws before enabling this feature.
Using the BlackVue mobile app, which connects to the camera via WiFi, you can see a live view of what the camera is capturing while rotating both cameras until the line of sight is perfect.
Summary
Following this process you’ve outfitted your Model S with one of the best cameras out there – a state-of-the-art BlackVue dashcam capable of recording in full HD, with built-in WiFi, a 64GB SD Card (approx. 2 days worth of recording before it loops), GPS tracking and G-force and motion detection. And best of all, it blends in seamlessly with the Tesla Model S making it virtually invisible from view.
Here’s a sample video I took from both the front and rear cameras to give you an idea of what the camera is capable of although YouTube seems to have altered the quality of the video.
We’ll be covering the features of the BlackVue DR650GW-2CH in an upcoming story with some more sample videos so check back soon. Until then, I wish you a happy install!
DIY
Tesla Model 3 pickup “Truckla” gets updates and a perfectly wholesome robot charger
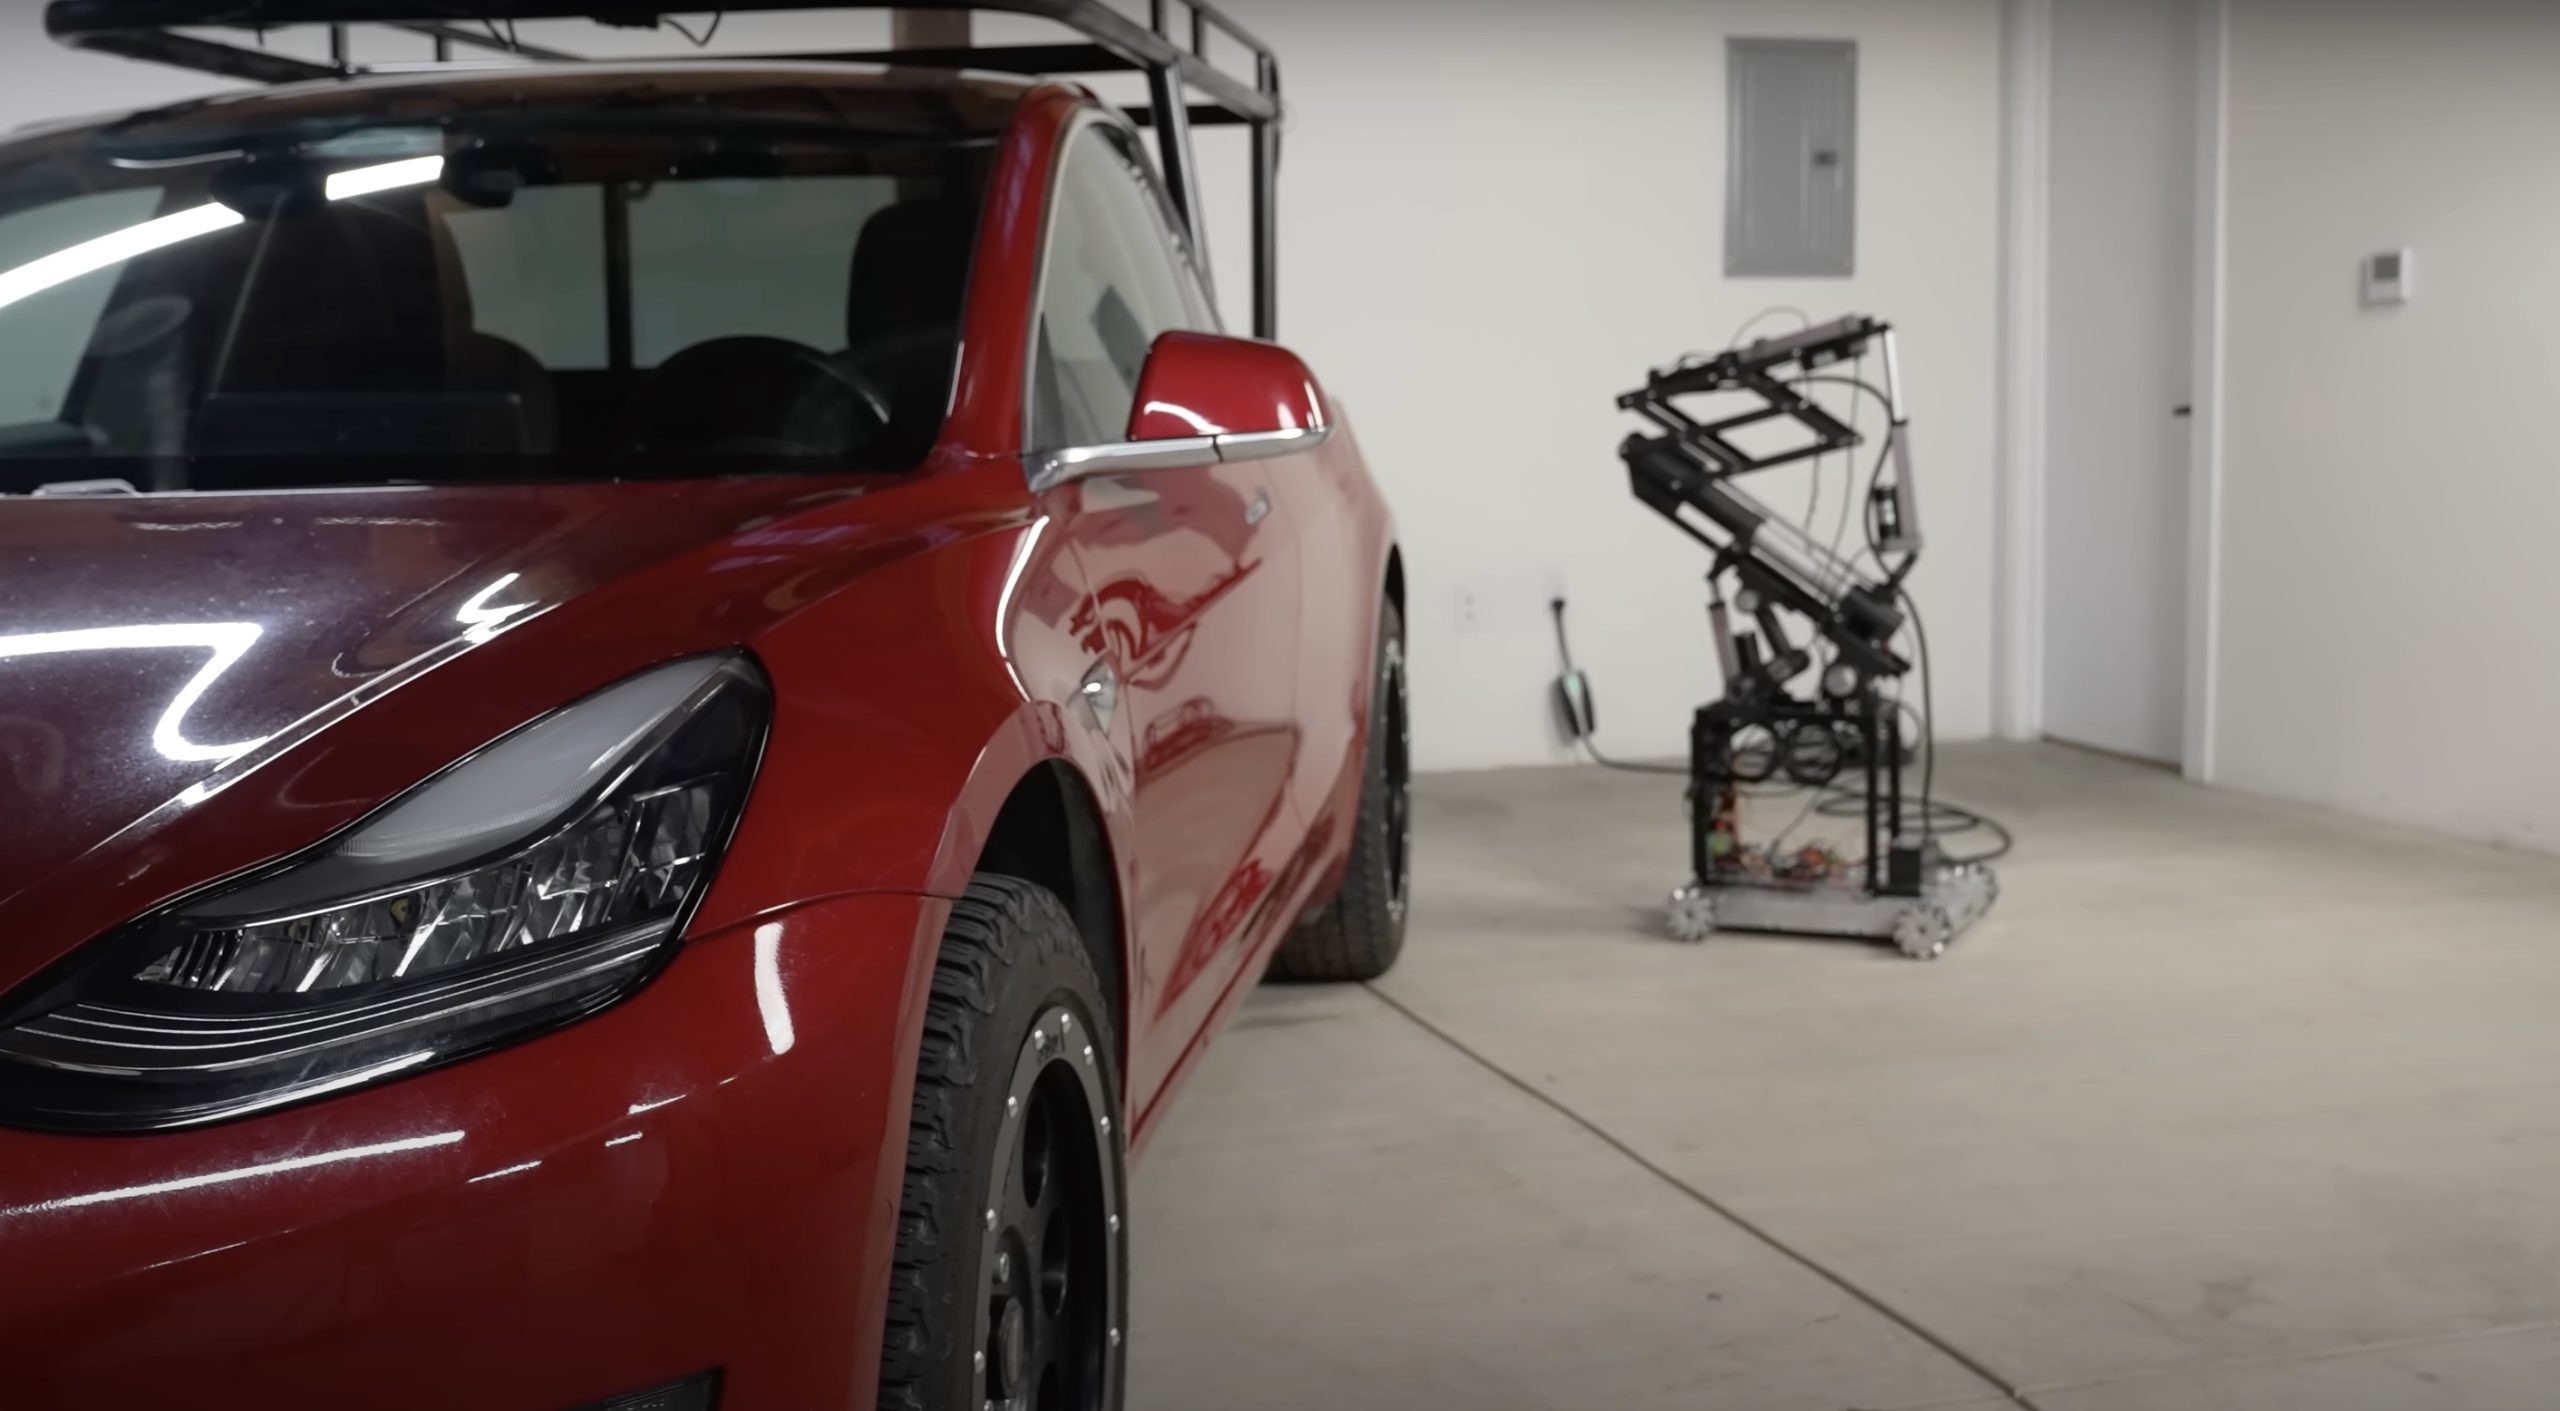
Back in 2019, YouTuber Simone Giertz, the self-proclaimed “Queen of Sh*tty Robots,” created a one-off Tesla Model 3 build that took the automotive world by storm. Fondly dubbed as “Truckla,” Giertz noted that the vehicle was actually her dream car — as crazy as that may sound.
Now almost four years later, the YouTuber posted an update on Truckla. And just like every other big project that one probably started, Giertz stated that she actually stopped working on Truckla when the vehicle was about 80% complete. The car is driving though, but a lot of stuff was not really working very well.
Thus, for her Truckla update, Giertz shared how most of her Model 3 pickup truck conversion was essentially completed. Truckla got a lot of detailing done, she got a slight lift, and she now has a functional tailgate. One has to admit, Truckla’s tailgate is pretty darn cool.
The “Queen of Sh*tty Robots” also opted to give Truckla a friend in the form of an automatic robot charger. Unlike Tesla’s rather interesting snake charger from years past, Truckla’s charger would come in the form of a rover, thanks to her friends at robotics platform Viam. Giertz aptly named Truckla’s robot charger friend “Chargela,” which is an appropriate name for such an invention.
Also true to form for Giertz, Chargela’s first encounter with Truckla was just a tiny bit awkward. One could say that Chargela may have just been a little bit nervous on his first try without human hands helping him. Most importantly, the system did work, so Giertz would likely keep using Chargela for her Model 3 pickup.
Teslas are very tech-heavy vehicles, so projects like Giertz’s Truckla are always remarkable. The fact that the Model 3 works perfectly fine despite having a good chunk of it cut off and turned into a pickup truck bed is mighty impressive any way one looks at it. Overall, Truckla will always be one of the coolest Tesla DIY projects to date, so any updates about the vehicle are always appreciated.
Truckla’s nearly four-year update can be viewed below.
Don’t hesitate to contact us with news tips. Just send a message to simon@teslarati.com to give us a heads up.
DIY
Tesla fan creating ‘CyberRoadster’ using Model 3 Performance parts in epic DIY build
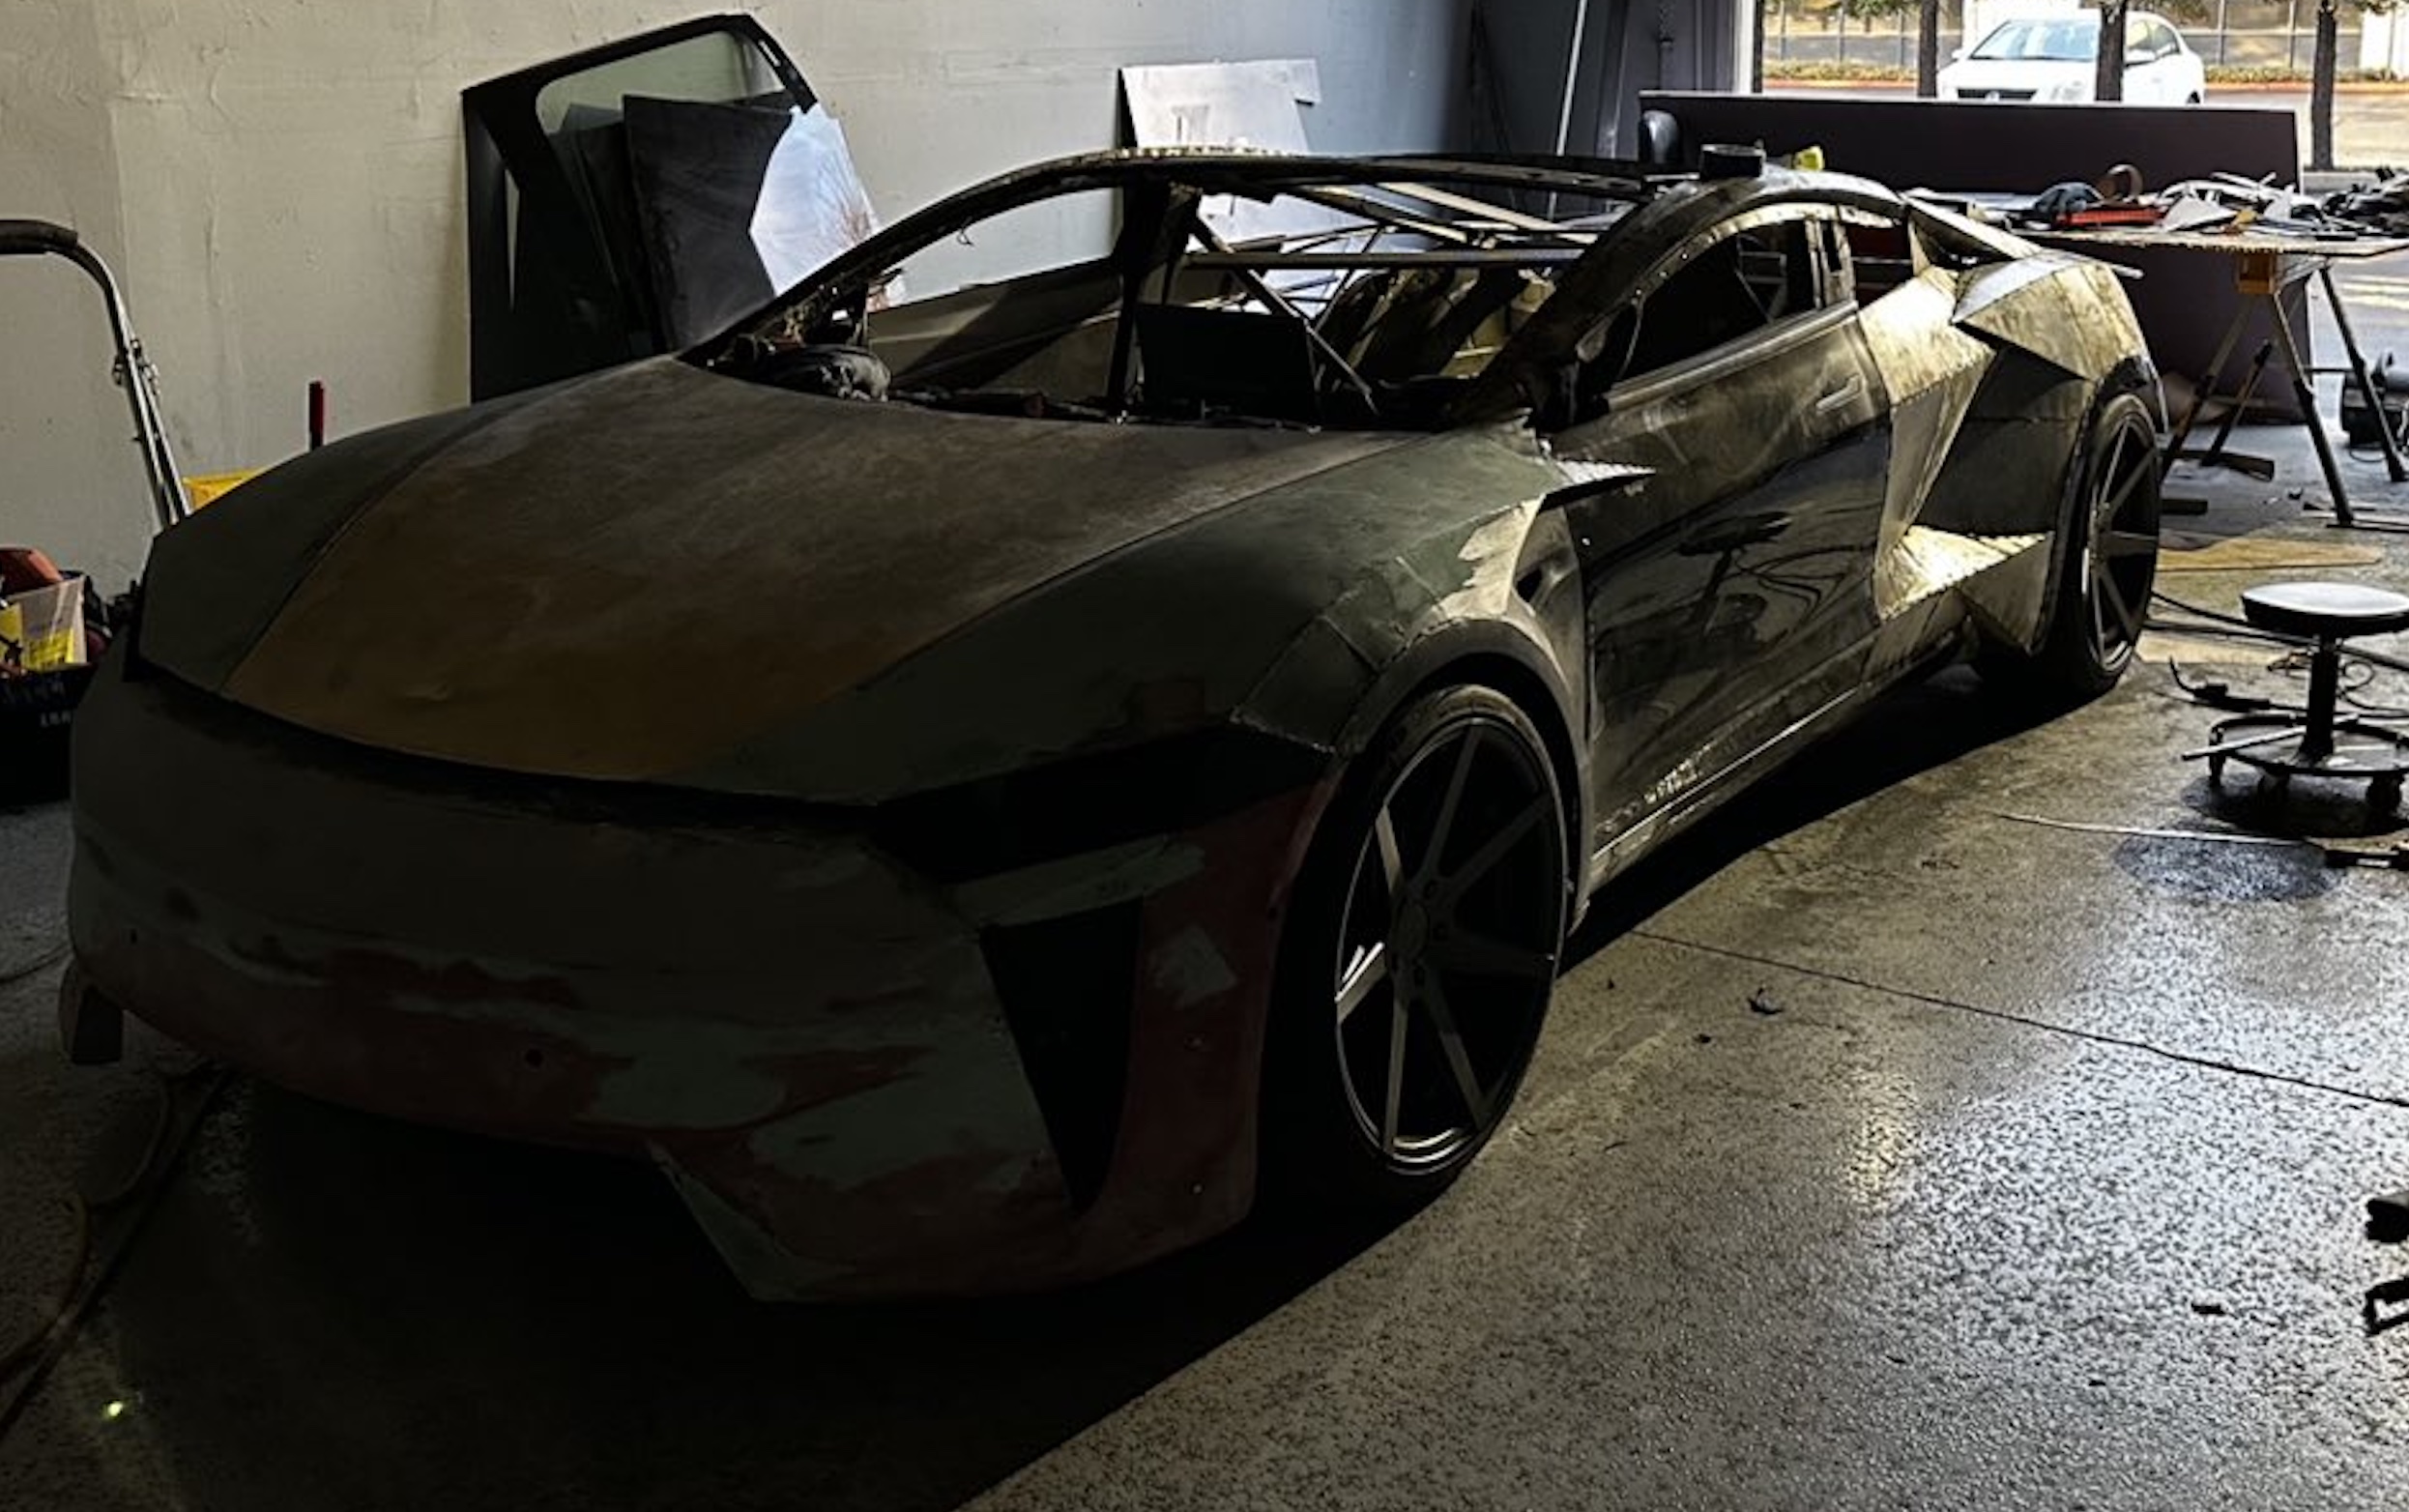
A Tesla owner is taking his hobby and love for electric vehicles to new levels by creating what could only be described as one of the coolest EV-related DIY projects to date. The idea for the project is simple: what happens when you cross a supercar with the Cybertruck? You end up with a two-seater CyberRoadster.
Tesla owner David Andreyev, who goes by the username @Cyber_Hooligan_ on Twitter, has spent the last few months creating a Cybertruck-inspired version of the next-generation Roadster made from a salvaged Model 3 Performance. Starting with a Model 3 Performance is an inspired choice, considering that it is Tesla’s first vehicle that has a dedicated Track Mode.
A look at Andreyev’s YouTube channel, which can be accessed here, shows the meticulous build that the Tesla owner has implemented on the project car. What’s particularly cool about the CyberRoadster is the fact that it’s being built with parts that are also from other Tesla vehicles, like its front bumper that came from a new Model S. Recent videos suggest that the project car’s rear bumper will be from a new Model S as well.
The journey is long for Andreyev, so the completion of the CyberRoadster will likely take some more time. Despite this, seeing the Tesla owner’s DIY journey on such an epic build is more than satisfying. And considering that the CyberRoadster is evidently a labor of love from the Tesla owner, the final results would likely be extremely worth it.
There’s a lot of crazy Tesla modifications that have been done as of late. But some, as it is with a lot of things on the internet these days, have become more silly gimmicks than serious automotive projects. Fortunately, car enthusiasts like Andreyev, who just happen to also love electric vehicles, are taking it upon themselves to create one-of-a-kind EVs that would surely capture the attention of anyone on the road.
Check out the latest video in the CyberRoadster’s creation below.
Don’t hesitate to contact us with news tips. Just send a message to simon@teslarati.com to give us a heads up.
DIY
Tesla owner ‘charges’ Model 3 with homemade solar panel trailer
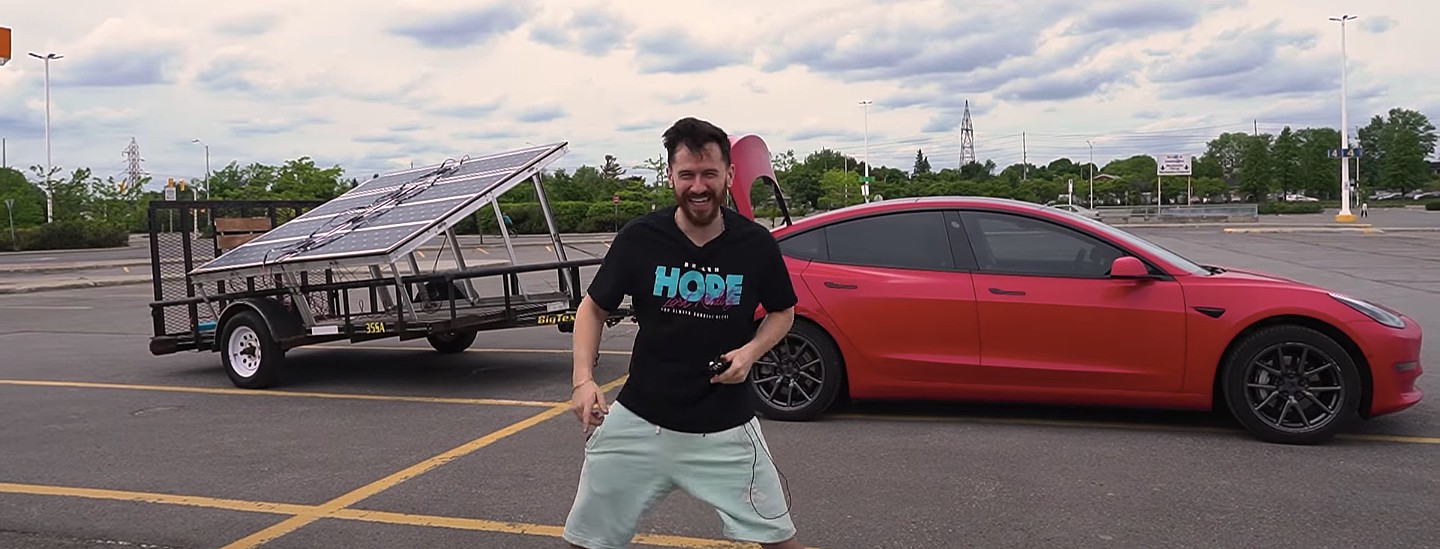
A Tesla owner has demonstrated a rather novel way to charge his Model 3. In a recent video, Sean Callaghan of the ItsYeBoi YouTube channel opted to use a series of off-the-shelf solar panel sheets onto a towable trailer to create a mobile charging unit for his all-electric sedan.
Callaghan planned to use only the sun and the solar sheets purchased from e-commerce platform Wish to charge his Model 3. The solar panel sheets would collect energy from the sun and transfer it to a control panel. The control panels were connected to batteries that would hold the energy—the batteries connected to an inverter, which would then charge the Tesla Model 3.
The entire assembly would provide the Model 3 with about 800 watts of energy on a completely sunny day. However, Callaghan shot the video when weather was overcast, so the entire solar panel trailer build only managed to provide around 300 watts throughout the YouTube host’s test.
To put this into perspective, a 100 volt home wall outlet provides 1.4 kilowatts of power, or 1,400 watts. Therefore, the 300-watt solar panel assembly built by Callaghan was producing less than 25% of the energy of a typical wall outlet. This is pretty marginal compared to Tesla’s 250-kilowatt V3 Superchargers, which provides 250,000 watts, or about 833 times as much power as the makeshift solar panel build.
However, Callaghan’s goal was not to charge the vehicle quickly. He explained the idea came from a previous video where he used a $5,000 Wish-purchased wind turbine to charge his Model 3. He wanted to test the effectiveness and efficiency of the system, which was questionable due to the time it would take to charge the battery fully.
The Model 3 battery pack is 78 kWh, and with Callaghan’s 300-watt system charging his electric vehicle, it would take 260 hours to supply the Tesla’s battery to full capacity.
In the past, electric vehicle enthusiasts have asked Tesla CEO Elon Musk why the company’s vehicles do not contain solar glass roofing, which would charge the car while the owner is driving. Musk has explained that the efficiency of this idea is challenging and likely would not provide an ample amount of range.
When asked about the idea of putting solar panels on the top of Tesla’s vehicles in 2017, Musk responded that the idea was “Not that helpful, because the actual surface of the car is not that much, and cars are often inside. The least efficient place to put solar is on the car.” It also would not be cost-effective for Tesla because “the cost of the panels and electronics, R&D and assembly would never pay for itself in the life of the vehicle, compared to charging from the wall in your garage,” Quartz noted.
That being said, Tesla plans to implement solar panels onto the motorized tonneau of the upcoming Cybertruck. The idea was discussed on Twitter when Musk stated that the optional feature would add “15 miles per day, possibly more” when parked in the sunlight. Also, fold-out solar wings could help capture enough solar energy for 30 to 40 miles a day.
Watch Sean Callaghan’s video of his makeshift solar panel trailer below.
-

 News2 weeks ago
Tesla celebrates key milestone for 4680 battery cell production cost
-
 News2 weeks ago
I took a Tesla new Model Y Demo Drive – Here’s what I learned
-
 News2 weeks ago
Tesla’s Giga Texas vehicles now drive themselves to outbound lot
-

 News2 weeks ago
Tesla’s ecological paradise near Giga Texas takes shape
-

 News2 weeks ago
Elon Musk and top Trump trade advisor Peter Navarro lock horns over tariffs
-

 News2 weeks ago
Tesla bull lowers price target citing ‘brand crisis’
-
 News2 weeks ago
Tesla adding new safety features for improved emergency detection
-
 News2 weeks ago
Tesla rolls out latest Safety Score update—Here’s what’s new

